Prep: Things to do before we get started.
Open these slides: https://tampa.bretfisher.com/
Get a server: I provisioned one for each. Ask me for the IPs.
Access your server over SSH
ssh docker@w.x.y.zor WebSSH (http://w.x.y.z:8080)- username: docker | password: training
Let me know if you can't get in, we have multiple backup options!
Note
This is hands on. You'll want to do most of these commands with me.
These slides are take-home.
Introductions
Hello! I'm Bret Fisher (@bretfisher), a fan of 🐳 🏖 🥃 👾 ✈️ 🐶
I'm a DevOps Consultant+Trainer (300k students), OSS maintainer, and Docker Captain.
👉 Watch: My weekly cloud native DevOps live show with guests. Join us on Thursdays!
👉 Listen: That show turns into a podcast called "DevOps and Docker Talk."
👉 Read: You can get my weekly updates in my Newsletter.
👉 Chat: Join 12k DevOps pros in my Discord server devops.fan logistics-bret.md
Accessing these slides now
We recommend that you open these slides in your browser:
This is a public URL, you're welcome to share it with others!
Use arrows to move to next/previous slide
(up, down, left, right, page up, page down)
Type a slide number + ENTER to go to that slide
The slide number is also visible in the URL bar
(e.g. .../#123 for slide 123)
These slides are open source
The sources of these slides are available in a public GitHub repository:
These slides are written in Markdown
You are welcome to share, re-use, re-mix these slides
Typos? Mistakes? Questions? Feel free to hover over the bottom of the slide ...
👇 Try it! The source file will be shown and you can view it on GitHub and fork and edit it.
Accessing these slides later
Slides will remain online so you can review them later if needed
(let's say we'll keep them online at least 1 year, how about that?)
You can download the slides using that URL:
https://tampa.bretfisher.com/slides.zip
(then open the file
docker.yml.html)You can also generate a PDF of the slides
(by printing them to a file; but be patient with your browser!)
These slides are constantly updated
Extra details
This slide has a little magnifying glass in the top left corner
This magnifying glass indicates slides that provide extra details
Feel free to skip them if:
you are in a hurry
you are new to this and want to avoid cognitive overload
you want only the most essential information
You can review these slides another time if you want, they'll be waiting for you ☺
Part 3
- (Extra Docker content)
- Tips for efficient Dockerfiles
- Dockerfile examples
- Reducing image size
- Multi-stage builds
- Exercise — writing better Dockerfiles
- Getting inside a container
- Restarting and attaching to containers
- Naming and inspecting containers
- Labels
- Advanced Dockerfile Syntax
- Container network drivers
(auto-generated TOC)
What is Docker, the idea?
Docker Inc makes many tools to build, deploy, and run containers.
They invented the modern way to run "containers". (previously jails, chroot, zones, etc.)
What is Docker, the idea?
Docker Inc makes many tools to build, deploy, and run containers.
They invented the modern way to run "containers". (previously jails, chroot, zones, etc.)
Their original 2013 ideas are now an industry standard called OCI.
Those standards are now used by hundreds of tools in the Cloud Native computing.
The three innovations are:
- Combine your app and all its dependencies in a container image
- Move that image around with registries
- Run that image anywhere in a container
I wrote a big article around this with lots of details. Bookmark for later!
What is Docker Inc., the company?
Docker Inc was quicly formed after Docker the tool/project was created in 2013.
Previously, Docker Inc. focused on Dev and Ops tooling (2013-2019).
What is Docker Inc., the company?
Docker Inc was quicly formed after Docker the tool/project was created in 2013.
Previously, Docker Inc. focused on Dev and Ops tooling (2013-2019).
In 2019 they sold 2/3rd of company and Enterprise-focused software to Mirantis.
Now they are (finally) successful focusing on Dev tooling.
Docker Subscription includes:
- Docker Desktop for macOS, Windows, Linux desktops
- Docker Hub image storage
- Image security scans
- Automated image builds
We're only using Docker open source today!
Their Hub & Docker Desktop are totally free while learning and for personal use.
What is docker the tool?
"Installing Docker" really means "Installing the Docker Engine and CLI".
The Docker Engine is a daemon (a service running in the background).
What is docker the tool?
"Installing Docker" really means "Installing the Docker Engine and CLI".
The Docker Engine is a daemon (a service running in the background).
This daemon manages containers, the same way that a hypervisor manages VMs.
We interact with the Docker Engine by using the Docker CLI.
The Docker CLI and the Docker Engine communicate through an API.
There are many other programs and client libraries which use that API.
Didn't Kubernetes replace Docker?
- This is a common misconception.
Didn't Kubernetes replace Docker?
This is a common misconception.
Docker only controls many containers on a single server.
Kubernetes (K8s) was invented to control Docker across many servers.
Didn't Kubernetes replace Docker?
This is a common misconception.
Docker only controls many containers on a single server.
Kubernetes (K8s) was invented to control Docker across many servers.
Kubernetes doesn't run containers itself, it only controls a runtime.
Didn't Kubernetes replace Docker?
This is a common misconception.
Docker only controls many containers on a single server.
Kubernetes (K8s) was invented to control Docker across many servers.
Kubernetes doesn't run containers itself, it only controls a runtime.
For years, Docker (
dockerd) was the most popular container runtime.Then Docker Inc. created
containerdas a lightweight runtime for servers.
Didn't Kubernetes replace Docker?
This is a common misconception.
Docker only controls many containers on a single server.
Kubernetes (K8s) was invented to control Docker across many servers.
Kubernetes doesn't run containers itself, it only controls a runtime.
For years, Docker (
dockerd) was the most popular container runtime.Then Docker Inc. created
containerdas a lightweight runtime for servers.Today
dockerdandcontainerdare most of runtime market. Others include CRI-O and Podman (Red Hat).
Didn't Kubernetes replace Docker?
This is a common misconception.
Docker only controls many containers on a single server.
Kubernetes (K8s) was invented to control Docker across many servers.
Kubernetes doesn't run containers itself, it only controls a runtime.
For years, Docker (
dockerd) was the most popular container runtime.Then Docker Inc. created
containerdas a lightweight runtime for servers.Today
dockerdandcontainerdare most of runtime market. Others include CRI-O and Podman (Red Hat).dockerdorpodman= best for humans locally.containerdorcri-o= best for K8s.
Did you know Docker has its own Orchestration?
Docker Swarm "mode" is still a thing
And might be having a renaissance
(I have a course on that too!) Todays_Agenda.md

Our training environment
(automatically generated title slide)
Our training environment
If you are attending a tutorial or workshop:
- a VM has been provisioned for each student
If you are doing or re-doing this course on your own, you can:
install Docker locally (as explained in the chapter "Installing Docker")
install Docker on e.g. a cloud VM
use https://www.play-with-docker.com/ to instantly get a training environment
containers/Training_Environment.md
Checking your Virtual Machine
Once logged in, make sure that you can run a basic Docker command:
$ docker versionClient: Docker Engine - Community Version: 20.10.17 API version: 1.41 Go version: go1.17.11 Git commit: 100c701 Built: Mon Jun 6 23:02:46 2022 OS/Arch: linux/amd64 Context: default Experimental: trueServer: Docker Engine - Community Engine: Version: 20.10.17 API version: 1.41 (minimum version 1.12) Go version: go1.17.11 Git commit: a89b842 Built: Mon Jun 6 23:00:51 2022 OS/Arch: linux/amd64 Experimental: false...If this doesn't work, raise your hand so that an instructor can assist you!
:EN:Container concepts :FR:Premier contact avec les conteneurs
:EN:- What's a container engine? :FR:- Qu'est-ce qu'un container engine ?

Our first containers
(automatically generated title slide)
Objectives
At the end of this lesson, you will have:
Seen Docker in action.
Started your first containers.
containers/First_Containers.md
Hello World
In your Docker environment, just run the following command:
$ docker run busybox echo hello worldhello world(If your Docker install is brand new, you will also see a few extra lines,
corresponding to the download of the busybox image.)
containers/First_Containers.md
That was our first container!
We used one of the smallest, simplest images available:
busybox.busyboxis typically used in embedded systems (phones, routers...)We ran a single process and echo'ed
hello world.
containers/First_Containers.md
A more useful container
Let's run a more exciting container:
$ docker run -it ubunturoot@04c0bb0a6c07:/#This is a brand new container.
It runs a bare-bones, no-frills
ubuntusystem.-itis shorthand for-i -t.-itells Docker to connect us to the container's stdin.-ttells Docker that we want a pseudo-terminal.
containers/First_Containers.md
Do something in our container
Try to run figlet in our container.
root@04c0bb0a6c07:/# figlet hellobash: figlet: command not foundAlright, we need to install it.
containers/First_Containers.md
Install a package in our container
We want figlet, so let's install it:
root@04c0bb0a6c07:/# apt-get update...Fetched 1514 kB in 14s (103 kB/s)Reading package lists... Doneroot@04c0bb0a6c07:/# apt-get install figletReading package lists... Done...One minute later, figlet is installed!
containers/First_Containers.md
Try to run our freshly installed program
The figlet program takes a message as parameter.
root@04c0bb0a6c07:/# figlet hello _ _ _ | |__ ___| | | ___ | '_ \ / _ \ | |/ _ \ | | | | __/ | | (_) ||_| |_|\___|_|_|\___/Beautiful! 😍
containers/First_Containers.md
Counting packages in the container
Let's check how many packages are installed there.
root@04c0bb0a6c07:/# dpkg -l | wc -l97dpkg -llists the packages installed in our containerwc -lcounts them
How many packages do we have on our host?
containers/First_Containers.md
Counting packages on the host
Exit the container by logging out of the shell, like you would usually do.
(E.g. with ^D or exit)
root@04c0bb0a6c07:/# exitNow, try to:
run
dpkg -l | wc -l. How many packages are installed?run
figlet. Does that work?
containers/First_Containers.md
Host and containers are independent things
We ran an
ubuntucontainer on an Linux/Windows/macOS host.They have different, independent packages.
Installing something on the host doesn't expose it to the container.
And vice-versa.
Even if both the host and the container have the same Linux distro!
We can run any container on any host.
(One exception: Windows containers can only run on Windows hosts; at least for now.)
containers/First_Containers.md
Where's our container?
Our container is now in a stopped state.
It still exists on disk, but all compute resources have been freed up.
We will see later how to get back to that container.
containers/First_Containers.md
Starting another container
What if we start a new container, and try to run figlet again?
$ docker run -it ubunturoot@b13c164401fb:/# figletbash: figlet: command not foundWe started a brand new container.
The basic Ubuntu image was used, and
figletis not here.
containers/First_Containers.md
Where's my container?
Can we reuse that container that we took time to customize?
We can, but that's not the default workflow with Docker.
What's the default workflow, then?
Always start with a fresh container.
If we need something installed in our container, build a custom image.That seems complicated!
We'll see that it's actually pretty easy!
And what's the point?
This puts a strong emphasis on automation and repeatability. Let's see why ...
containers/First_Containers.md
Pets vs. Cattle
In the "pets vs. cattle" metaphor, there are two kinds of servers.
Pets:
have distinctive names and unique configurations
when they have an outage, we do everything we can to fix them
Cattle:
have generic names (e.g. with numbers) and generic configuration
configuration is enforced by configuration management, golden images ...
when they have an outage, we can replace them immediately with a new server
What's the connection with Docker and containers?
containers/First_Containers.md
Local development environments
When we use local VMs (with e.g. VirtualBox or VMware), our workflow looks like this:
create VM from base template (Ubuntu, CentOS...)
install packages, set up environment
work on project
when done, shut down VM
next time we need to work on project, restart VM as we left it
if we need to tweak the environment, we do it live
Over time, the VM configuration evolves, diverges.
We don't have a clean, reliable, deterministic way to provision that environment.
containers/First_Containers.md
Local development with Docker
With Docker, the workflow looks like this:
create container image with our dev environment
run container with that image
work on project
when done, shut down container
next time we need to work on project, start a new container
if we need to tweak the environment, we create a new image
We have a clear definition of our environment, and can share it reliably with others.
Let's see in the next chapters how to bake a custom image with
figlet!
:EN:- Running our first container :FR:- Lancer nos premiers conteneurs

Background containers
(automatically generated title slide)
Objectives
Our first containers were interactive.
We will now see how to:
- Run a non-interactive container.
- Run a container in the background.
- List running containers.
- Check the logs of a container.
- Stop a container.
- List stopped containers.
containers/Background_Containers.md
A non-interactive container
We will run a small custom container.
This container just displays the time every second.
$ docker run jpetazzo/clockFri Feb 20 00:28:53 UTC 2015Fri Feb 20 00:28:54 UTC 2015Fri Feb 20 00:28:55 UTC 2015...- This container will run forever.
- To stop it, press
^C. - Docker has automatically downloaded the image
jpetazzo/clock. - This image is a user image, created by
jpetazzo. - We will hear more about user images (and other types of images) later.
containers/Background_Containers.md
When ^C doesn't work...
Sometimes, ^C won't be enough.
Why? And how can we stop the container in that case?
containers/Background_Containers.md
What happens when we hit ^C
SIGINT gets sent to the container, which means:
SIGINTgets sent to PID 1 (default case)SIGINTgets sent to foreground processes when running with-ti
But there is a special case for PID 1: it ignores all signals!
except
SIGKILLandSIGSTOPexcept signals handled explicitly
TL,DR: there are many circumstances when ^C won't stop the container.
containers/Background_Containers.md
Why is PID 1 special?
PID 1 has some extra responsibilities:
it starts (directly or indirectly) every other process
when a process exits, its processes are "reparented" under PID 1
When PID 1 exits, everything stops:
on a "regular" machine, it causes a kernel panic
in a container, it kills all the processes
We don't want PID 1 to stop accidentally
That's why it has these extra protections
containers/Background_Containers.md
How to stop these containers, then?
Start another terminal and forget about them
(for now!)
We'll shortly learn about
docker kill
containers/Background_Containers.md
Run a container in the background
Containers can be started in the background, with the -d flag (daemon mode):
$ docker run -d jpetazzo/clock47d677dcfba4277c6cc68fcaa51f932b544cab1a187c853b7d0caf4e8debe5ad- We don't see the output of the container.
- But don't worry: Docker collects that output and logs it!
- Docker gives us the ID of the container.
containers/Background_Containers.md
List running containers
How can we check that our container is still running?
With docker ps, just like the UNIX ps command, lists running processes.
$ docker psCONTAINER ID IMAGE ... CREATED STATUS ...47d677dcfba4 jpetazzo/clock ... 2 minutes ago Up 2 minutes ...Docker tells us:
- The (truncated) ID of our container.
- The image used to start the container.
- That our container has been running (
Up) for a couple of minutes. - Other information (COMMAND, PORTS, NAMES) that we will explain later.
containers/Background_Containers.md
Starting more containers
Let's start two more containers.
$ docker run -d jpetazzo/clock57ad9bdfc06bb4407c47220cf59ce21585dce9a1298d7a67488359aeaea8ae2a$ docker run -d jpetazzo/clock068cc994ffd0190bbe025ba74e4c0771a5d8f14734af772ddee8dc1aaf20567dCheck that docker ps correctly reports all 3 containers.
containers/Background_Containers.md
Viewing only the last container started
When many containers are already running, it can be useful to see only the last container that was started.
This can be achieved with the -l ("Last") flag:
$ docker ps -lCONTAINER ID IMAGE ... CREATED STATUS ...068cc994ffd0 jpetazzo/clock ... 2 minutes ago Up 2 minutes ...containers/Background_Containers.md
View only the IDs of the containers
Many Docker commands will work on container IDs: docker stop, docker rm...
If we want to list only the IDs of our containers (without the other columns
or the header line),
we can use the -q ("Quiet", "Quick") flag:
$ docker ps -q068cc994ffd057ad9bdfc06b47d677dcfba4containers/Background_Containers.md
Combining flags
We can combine -l and -q to see only the ID of the last container started:
$ docker ps -lq068cc994ffd0At a first glance, it looks like this would be particularly useful in scripts.
However, if we want to start a container and get its ID in a reliable way,
it is better to use docker run -d, which we will cover in a bit.
(Using docker ps -lq is prone to race conditions: what happens if someone
else, or another program or script, starts another container just before
we run docker ps -lq?)
containers/Background_Containers.md
View the logs of a container
We told you that Docker was logging the container output.
Let's see that now.
$ docker logs 068Fri Feb 20 00:39:52 UTC 2015Fri Feb 20 00:39:53 UTC 2015...- We specified a prefix of the full container ID.
- You can, of course, specify the full ID.
- The
logscommand will output the entire logs of the container.
(Sometimes, that will be too much. Let's see how to address that.)
containers/Background_Containers.md
View only the tail of the logs
To avoid being spammed with eleventy pages of output,
we can use the --tail option:
$ docker logs --tail 3 068Fri Feb 20 00:55:35 UTC 2015Fri Feb 20 00:55:36 UTC 2015Fri Feb 20 00:55:37 UTC 2015- The parameter is the number of lines that we want to see.
containers/Background_Containers.md
Follow the logs in real time
Just like with the standard UNIX command tail -f, we can
follow the logs of our container:
$ docker logs --tail 1 --follow 068Fri Feb 20 00:57:12 UTC 2015Fri Feb 20 00:57:13 UTC 2015^C- This will display the last line in the log file.
- Then, it will continue to display the logs in real time.
- Use
^Cto exit.
containers/Background_Containers.md
Stop our container
There are two ways we can terminate our detached container.
- Killing it using the
docker killcommand. - Stopping it using the
docker stopcommand.
The first one stops the container immediately, by using the
KILL signal.
The second one is more graceful. It sends a TERM signal,
and after 10 seconds, if the container has not stopped, it
sends KILL.
Reminder: the KILL signal cannot be intercepted, and will
forcibly terminate the container.
containers/Background_Containers.md
Stopping our containers
Let's stop one of those containers:
$ docker stop 47d647d6This will take 10 seconds:
- Docker sends the TERM signal;
- the container doesn't react to this signal (it's a simple Shell script with no special signal handling);
- 10 seconds later, since the container is still running, Docker sends the KILL signal;
- this terminates the container.
containers/Background_Containers.md
Killing the remaining containers
Let's be less patient with the two other containers:
$ docker kill 068 57ad06857adThe stop and kill commands can take multiple container IDs.
Those containers will be terminated immediately (without the 10-second delay).
Let's check that our containers don't show up anymore:
$ docker pscontainers/Background_Containers.md
List stopped containers
We can also see stopped containers, with the -a (--all) option.
$ docker ps -aCONTAINER ID IMAGE ... CREATED STATUS068cc994ffd0 jpetazzo/clock ... 21 min. ago Exited (137) 3 min. ago57ad9bdfc06b jpetazzo/clock ... 21 min. ago Exited (137) 3 min. ago47d677dcfba4 jpetazzo/clock ... 23 min. ago Exited (137) 3 min. ago5c1dfd4d81f1 jpetazzo/clock ... 40 min. ago Exited (0) 40 min. agob13c164401fb ubuntu ... 55 min. ago Exited (130) 53 min. ago:EN:- Foreground and background containers :FR:- Exécution interactive ou en arrière-plan

Understanding Docker images
(automatically generated title slide)
Objectives
In this section, we will explain:
What is an image.
What is a layer.
The various image namespaces.
How to search and download images.
Image tags and when to use them.
What is an image?
Image = files + metadata
These files form the root filesystem of our container.
The metadata can indicate a number of things, e.g.:
- the author of the image
- the command to execute in the container when starting it
- environment variables to be set
- etc.
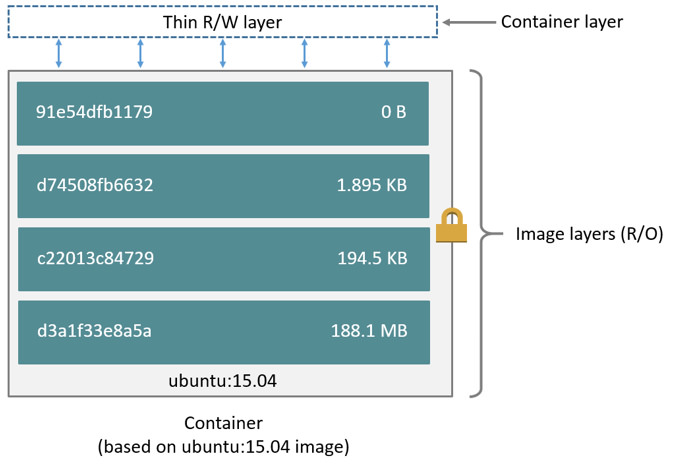
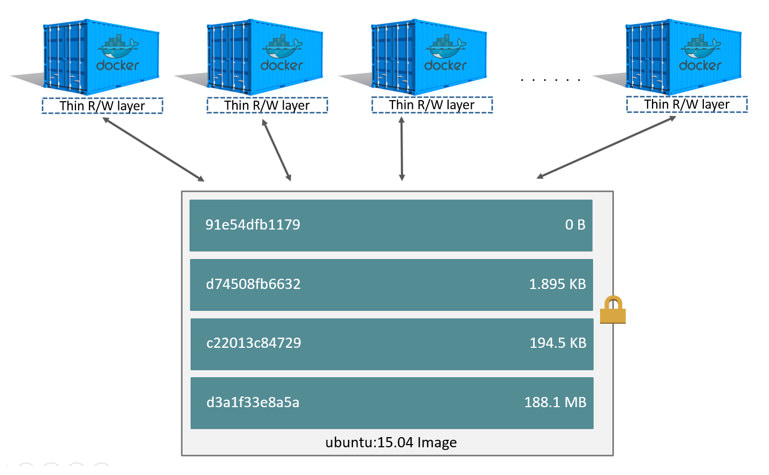
Images are made of layers, conceptually stacked on top of each other.
Each layer can add, change, and remove files and/or metadata.
Images can share layers to optimize disk usage, transfer times, and memory use.
Example for a Java webapp
Each of the following items will correspond to one layer:
- CentOS base layer
- Packages and configuration files added by our local IT
- JRE
- Tomcat
- Our application's dependencies
- Our application code and assets
- Our application configuration
(Note: app config is generally added by orchestration facilities.)
Differences between containers and images
An image is a read-only filesystem.
A container is an encapsulated set of processes,
running in a read-write copy of that filesystem.
To optimize container boot time, copy-on-write is used instead of regular copy.
docker runstarts a container from a given image.
Wait a minute...
If an image is read-only, how do we change it?
We don't.
We create a new container from that image.
Then we make changes to that container.
When we are satisfied with those changes, we transform them into a new layer.
A new image is created by stacking the new layer on top of the old image.
A chicken-and-egg problem
The only way to create an image is by "freezing" a container.
The only way to create a container is by instantiating an image.
Help!
Creating the first images
There is a special empty image called scratch.
- It allows to build from scratch.
The docker import command loads a tarball into Docker.
- The imported tarball becomes a standalone image.
- That new image has a single layer.
Note: you will probably never have to do this yourself.
Creating other images
docker commit
- Saves all the changes made to a container into a new layer.
- Creates a new image (effectively a copy of the container).
docker build (used 99% of the time)
- Performs a repeatable build sequence.
- This is the preferred method!
We will explain both methods in a moment.
Images namespaces
There are three namespaces:
Official images
e.g.
ubuntu,busybox...User (and organizations) images
e.g.
bretfisher/clockSelf-hosted images
e.g.
registry.example.com:5000/my-private/image
Let's explain each of them.
Root namespace
The root namespace is for official images.
They are gated by Docker Inc.
They are generally authored and maintained by third parties.
Those images include:
Small, "swiss-army-knife" images like busybox.
Distro images to be used as bases for your builds, like ubuntu, fedora...
Ready-to-use components and services, like redis, postgresql...
Over 150 at this point!
User namespace
The user namespace holds images for Docker Hub users and organizations.
For example:
bretfisher/clockThe Docker Hub user is:
bretfisherThe image name is:
clockSelf-hosted namespace
This namespace holds images which are not hosted on Docker Hub, but on third party registries.
They contain the hostname (or IP address), and optionally the port, of the registry server.
For example:
localhost:5000/wordpresslocalhost:5000is the host and port of the registrywordpressis the name of the image
Other examples:
quay.io/coreos/etcdgcr.io/google-containers/hugoHow do you store and manage images?
Images can be stored:
- On your Docker host.
- In a Docker registry.
You can use the Docker client to download (pull) or upload (push) images.
To be more accurate: you can use the Docker client to tell a Docker Engine to push and pull images to and from a registry.
Showing current images
Let's look at what images are on our host now.
$ docker imagesREPOSITORY TAG IMAGE ID CREATED SIZEfedora latest ddd5c9c1d0f2 3 days ago 204.7 MBcentos latest d0e7f81ca65c 3 days ago 196.6 MBubuntu latest 07c86167cdc4 4 days ago 188 MBredis latest 4f5f397d4b7c 5 days ago 177.6 MBpostgres latest afe2b5e1859b 5 days ago 264.5 MBalpine latest 70c557e50ed6 5 days ago 4.798 MBdebian latest f50f9524513f 6 days ago 125.1 MBbusybox latest 3240943c9ea3 2 weeks ago 1.114 MBtraining/namer latest 902673acc741 9 months ago 289.3 MBjpetazzo/clock latest 12068b93616f 12 months ago 2.433 MBDownloading images
There are two ways to download images.
Explicitly, with
docker pull.Implicitly, when executing
docker runand the image is not found locally.
Pulling an image
$ docker pull debian:jessiePulling repository debianb164861940b8: Download completeb164861940b8: Pulling image (jessie) from debiand1881793a057: Download completeAs seen previously, images are made up of layers.
Docker has downloaded all the necessary layers.
In this example,
:jessieindicates which exact version of Debian we would like.It is a version tag.
Image and tags
Images can have tags.
Tags define image versions or variants.
docker pull ubuntuwill refer toubuntu:latest.The
:latesttag is generally updated often.
When to (not) use tags
Don't specify tags:
- When doing rapid testing and prototyping.
- When experimenting.
- When you want the latest version.
Do specify tags:
- When recording a procedure into a script.
- When going to production.
- To ensure that the same version will be used everywhere.
- To ensure repeatability later.
This is similar to what we would do with pip install, npm install, etc.
Multi-arch images
An image can support multiple architectures
More precisely, a specific tag in a given repository can have either:
a single manifest referencing an image for a single architecture
a manifest list (or fat manifest) referencing multiple images
In a manifest list, each image is identified by a combination of:
os(linux, windows)architecture(amd64, arm, arm64...)optional fields like
variant(for arm and arm64),os.version(for windows)
Working with multi-arch images
The Docker Engine will pull "native" images when available
(images matching its own os/architecture/variant)
We can ask for a specific image platform with
--platformThe Docker Engine can run non-native images thanks to QEMU+binfmt
(automatically on Docker Desktop; with a bit of setup on Linux)
Section summary
We've learned how to:
- Understand images and layers.
- Understand Docker image namespacing.
- Search and download images.
:EN:Building images :EN:- Containers, images, and layers :EN:- Image addresses and tags :EN:- Finding and transferring images
:FR:Construire des images :FR:- La différence entre un conteneur et une image :FR:- La notion de layer partagé entre images

Building Docker images with a Dockerfile
(automatically generated title slide)
Objectives
We will build a container image automatically, with a Dockerfile.
At the end of this lesson, you will be able to:
Write a
Dockerfile.Build an image from a
Dockerfile.
containers/Building_Images_With_Dockerfiles.md
Dockerfile overview
A
Dockerfileis a build recipe for a Docker image.It contains a series of instructions telling Docker how an image is constructed.
The
docker buildcommand builds an image from aDockerfile.
containers/Building_Images_With_Dockerfiles.md
Writing our first Dockerfile
Our Dockerfile must be in a new, empty directory.
- Create a directory to hold our
Dockerfile.
$ mkdir myimage- Create a
Dockerfileinside this directory.
$ cd myimage$ vim DockerfileOf course, you can use any other editor of your choice.
containers/Building_Images_With_Dockerfiles.md
Type this into our Dockerfile...
FROM ubuntuRUN apt-get updateRUN apt-get install figletFROMindicates the base image for our build.Each
RUNline will be executed by Docker during the build.Our
RUNcommands must be non-interactive.
(No input can be provided to Docker during the build.)In many cases, we will add the
-yflag toapt-get.
containers/Building_Images_With_Dockerfiles.md
Build it!
Save our file, then execute:
$ docker build -t figlet .-tindicates the tag to apply to the image..indicates the location of the build context.
We will talk more about the build context later.
To keep things simple for now: this is the directory where our Dockerfile is located.
containers/Building_Images_With_Dockerfiles.md
What happens when we build the image?
It depends if we're using BuildKit or not!
If there are lots of blue lines and the first line looks like this:
[+] Building 1.8s (4/6)... then we're using BuildKit.
If the output is mostly black-and-white and the first line looks like this:
Sending build context to Docker daemon 2.048kB... then we're using the "classic" or "old-style" builder.
containers/Building_Images_With_Dockerfiles.md
To BuildKit or Not To BuildKit
Classic builder:
copies the whole "build context" to the Docker Engine
linear (processes lines one after the other)
requires a full Docker Engine
BuildKit:
only transfers parts of the "build context" when needed
will parallelize operations (when possible)
can run in non-privileged containers (e.g. on Kubernetes)
containers/Building_Images_With_Dockerfiles.md
With the classic builder
The output of docker build looks like this:
docker build -t figlet .Sending build context to Docker daemon 2.048kBStep 1/3 : FROM ubuntu ---> f975c5035748Step 2/3 : RUN apt-get update ---> Running in e01b294dbffd(...output of the RUN command...)Removing intermediate container e01b294dbffd ---> eb8d9b561b37Step 3/3 : RUN apt-get install figlet ---> Running in c29230d70f9b(...output of the RUN command...)Removing intermediate container c29230d70f9b ---> 0dfd7a253f21Successfully built 0dfd7a253f21Successfully tagged figlet:latest- The output of the
RUNcommands has been omitted. - Let's explain what this output means.
containers/Building_Images_With_Dockerfiles.md
Sending the build context to Docker
Sending build context to Docker daemon 2.048 kBThe build context is the
.directory given todocker build.It is sent (as an archive) by the Docker client to the Docker daemon.
This allows to use a remote machine to build using local files.
Be careful (or patient) if that directory is big and your link is slow.
You can speed up the process with a
.dockerignorefileIt tells docker to ignore specific files in the directory
Only ignore files that you won't need in the build context!
containers/Building_Images_With_Dockerfiles.md
Executing each step
Step 2/3 : RUN apt-get update ---> Running in e01b294dbffd(...output of the RUN command...)Removing intermediate container e01b294dbffd ---> eb8d9b561b37A container (
e01b294dbffd) is created from the base image.The
RUNcommand is executed in this container.The container is committed into an image (
eb8d9b561b37).The build container (
e01b294dbffd) is removed.The output of this step will be the base image for the next one.
containers/Building_Images_With_Dockerfiles.md
With BuildKit
[+] Building 7.9s (7/7) FINISHED => [internal] load build definition from Dockerfile 0.0s => => transferring dockerfile: 98B 0.0s => [internal] load .dockerignore 0.0s => => transferring context: 2B 0.0s => [internal] load metadata for docker.io/library/ubuntu:latest 1.2s => [1/3] FROM docker.io/library/ubuntu@sha256:cf31af331f38d1d7158470e095b132acd126a7180a54f263d386 3.2s => => resolve docker.io/library/ubuntu@sha256:cf31af331f38d1d7158470e095b132acd126a7180a54f263d386 0.0s => => sha256:cf31af331f38d1d7158470e095b132acd126a7180a54f263d386da88eb681d93 1.20kB / 1.20kB 0.0s => => sha256:1de4c5e2d8954bf5fa9855f8b4c9d3c3b97d1d380efe19f60f3e4107a66f5cae 943B / 943B 0.0s => => sha256:6a98cbe39225dadebcaa04e21dbe5900ad604739b07a9fa351dd10a6ebad4c1b 3.31kB / 3.31kB 0.0s => => sha256:80bc30679ac1fd798f3241208c14accd6a364cb8a6224d1127dfb1577d10554f 27.14MB / 27.14MB 2.3s => => sha256:9bf18fab4cfbf479fa9f8409ad47e2702c63241304c2cdd4c33f2a1633c5f85e 850B / 850B 0.5s => => sha256:5979309c983a2adeff352538937475cf961d49c34194fa2aab142effe19ed9c1 189B / 189B 0.4s => => extracting sha256:80bc30679ac1fd798f3241208c14accd6a364cb8a6224d1127dfb1577d10554f 0.7s => => extracting sha256:9bf18fab4cfbf479fa9f8409ad47e2702c63241304c2cdd4c33f2a1633c5f85e 0.0s => => extracting sha256:5979309c983a2adeff352538937475cf961d49c34194fa2aab142effe19ed9c1 0.0s => [2/3] RUN apt-get update 2.5s => [3/3] RUN apt-get install figlet 0.9s => exporting to image 0.1s => => exporting layers 0.1s => => writing image sha256:3b8aee7b444ab775975dfba691a72d8ac24af2756e0a024e056e3858d5a23f7c 0.0s => => naming to docker.io/library/figlet 0.0scontainers/Building_Images_With_Dockerfiles.md
Understanding BuildKit output
BuildKit transfers the Dockerfile and the build context
(these are the first two
[internal]stages)Then it executes the steps defined in the Dockerfile
(
[1/3],[2/3],[3/3])Finally, it exports the result of the build
(image definition + collection of layers)
containers/Building_Images_With_Dockerfiles.md
BuildKit plain output
When running BuildKit in e.g. a CI pipeline, its output will be different
We can see the same output format by using
--progress=plain
containers/Building_Images_With_Dockerfiles.md
The caching system
If you run the same build again, it will be instantaneous. Why?
After each build step, Docker takes a snapshot of the resulting image.
Before executing a step, Docker checks if it has already built the same sequence.
Docker uses the exact strings defined in your Dockerfile, so:
RUN apt-get install figlet cowsay
is different from
RUN apt-get install cowsay figletRUN apt-get updateis not re-executed when the mirrors are updated
You can force a rebuild with docker build --no-cache ....
containers/Building_Images_With_Dockerfiles.md
Running the image
The resulting image is not different from the one produced manually.
$ docker run -ti figletroot@91f3c974c9a1:/# figlet hello _ _ _ | |__ ___| | | ___ | '_ \ / _ \ | |/ _ \ | | | | __/ | | (_) ||_| |_|\___|_|_|\___/Yay! 🎉
containers/Building_Images_With_Dockerfiles.md
Using image and viewing history
The history command lists all the layers composing an image.
For each layer, it shows its creation time, size, and creation command.
When an image was built with a Dockerfile, each layer corresponds to a line of the Dockerfile.
$ docker history figletIMAGE CREATED CREATED BY SIZEf9e8f1642759 About an hour ago /bin/sh -c apt-get install fi 1.627 MB7257c37726a1 About an hour ago /bin/sh -c apt-get update 21.58 MB07c86167cdc4 4 days ago /bin/sh -c #(nop) CMD ["/bin 0 B<missing> 4 days ago /bin/sh -c sed -i 's/^#\s*\( 1.895 kB<missing> 4 days ago /bin/sh -c echo '#!/bin/sh' 194.5 kB<missing> 4 days ago /bin/sh -c #(nop) ADD file:b 187.8 MBcontainers/Building_Images_With_Dockerfiles.md
Why sh -c?
On UNIX, to start a new program, we need two system calls:
fork(), to create a new child process;execve(), to replace the new child process with the program to run.
Conceptually,
execve()works like this:execve(program, [list, of, arguments])When we run a command, e.g.
ls -l /tmp, something needs to parse the command.(i.e. split the program and its arguments into a list.)
The shell is usually doing that.
(It also takes care of expanding environment variables and special things like
~.)
containers/Building_Images_With_Dockerfiles.md
Why sh -c?
When we do
RUN ls -l /tmp, the Docker builder needs to parse the command.Instead of implementing its own parser, it outsources the job to the shell.
That's why we see
sh -c ls -l /tmpin that case.But we can also do the parsing jobs ourselves.
This means passing
RUNa list of arguments.This is called the exec syntax.
containers/Building_Images_With_Dockerfiles.md
Shell syntax vs exec syntax
Dockerfile commands that execute something can have two forms:
plain string, or shell syntax:
RUN apt-get install figletJSON list, or exec syntax:
RUN ["apt-get", "install", "figlet"]
We are going to change our Dockerfile to see how it affects the resulting image.
containers/Building_Images_With_Dockerfiles.md
Using exec syntax in our Dockerfile
Let's change our Dockerfile as follows!
FROM ubuntuRUN apt-get updateRUN ["apt-get", "install", "figlet"]Then build the new Dockerfile.
$ docker build -t figlet .containers/Building_Images_With_Dockerfiles.md
History with exec syntax
Compare the new history:
$ docker history figletIMAGE CREATED CREATED BY SIZE27954bb5faaf 10 seconds ago apt-get install figlet 1.627 MB7257c37726a1 About an hour ago /bin/sh -c apt-get update 21.58 MB07c86167cdc4 4 days ago /bin/sh -c #(nop) CMD ["/bin 0 B<missing> 4 days ago /bin/sh -c sed -i 's/^#\s*\( 1.895 kB<missing> 4 days ago /bin/sh -c echo '#!/bin/sh' 194.5 kB<missing> 4 days ago /bin/sh -c #(nop) ADD file:b 187.8 MBExec syntax specifies an exact command to execute.
Shell syntax specifies a command to be wrapped within
/bin/sh -c "...".
containers/Building_Images_With_Dockerfiles.md
When to use exec syntax and shell syntax
shell syntax:
- is easier to write
- interpolates environment variables and other shell expressions
- creates an extra process (
/bin/sh -c ...) to parse the string - requires
/bin/shto exist in the container
exec syntax:
- is harder to write (and read!)
- passes all arguments without extra processing
- doesn't create an extra process
- doesn't require
/bin/shto exist in the container - Typically only used for CMD at end of Dockerfile
containers/Building_Images_With_Dockerfiles.md

CMD and ENTRYPOINT
(automatically generated title slide)
Objectives
In this lesson, we will learn about two important Dockerfile commands:
CMD and ENTRYPOINT.
These commands allow us to set the default command to run in a container.
containers/Cmd_And_Entrypoint.md
Defining a default command
When people run our container, we want to greet them with a nice hello message, and using a custom font.
For that, we will execute:
figlet -f script hello-f scripttells figlet to use a fancy font.hellois the message that we want it to display.
containers/Cmd_And_Entrypoint.md
Adding CMD to our Dockerfile
Our new Dockerfile will look like this:
FROM ubuntuRUN apt-get updateRUN ["apt-get", "install", "figlet"]CMD figlet -f script helloCMDdefines a default command to run when none is given.It can appear at any point in the file.
Each
CMDwill replace and override the previous one.As a result, while you can have multiple
CMDlines, it is useless.
containers/Cmd_And_Entrypoint.md
Build and test our image
Let's build it:
$ docker build -t figlet ....Successfully built 042dff3b4a8dSuccessfully tagged figlet:latestAnd run it:
$ docker run figlet _ _ _ | | | | | | | | _ | | | | __ |/ \ |/ |/ |/ / \_| |_/|__/|__/|__/\__/containers/Cmd_And_Entrypoint.md
Overriding CMD
If we want to get a shell into our container (instead of running
figlet), we just have to specify a different program to run:
$ docker run -it figlet bashroot@7ac86a641116:/#We specified
bash.It replaced the value of
CMD.
containers/Cmd_And_Entrypoint.md
Using ENTRYPOINT
We want to be able to specify a different message on the command line,
while retaining figlet and some default parameters.
In other words, we would like to be able to do this:
$ docker run figlet salut _ | | , __, | | _|_ / \_/ | |/ | | | \/ \_/|_/|__/ \_/|_/|_/We will use the ENTRYPOINT verb in Dockerfile.
containers/Cmd_And_Entrypoint.md
Adding ENTRYPOINT to our Dockerfile
Our new Dockerfile will look like this:
FROM ubuntuRUN apt-get updateRUN ["apt-get", "install", "figlet"]ENTRYPOINT ["figlet", "-f", "script"]ENTRYPOINTdefines a base command (and its parameters) for the container.The command line arguments are appended to those parameters.
Like
CMD,ENTRYPOINTcan appear anywhere, and replaces the previous value.
Why did we use JSON syntax for our ENTRYPOINT?
containers/Cmd_And_Entrypoint.md
Implications of JSON vs string syntax
When CMD or ENTRYPOINT use string syntax, they get wrapped in
sh -c.To avoid this wrapping, we can use JSON syntax.
What if we used ENTRYPOINT with string syntax?
$ docker run figlet salutThis would run the following command in the figlet image:
sh -c "figlet -f script" salutcontainers/Cmd_And_Entrypoint.md
Build and test our image
Let's build it:
$ docker build -t figlet ....Successfully built 36f588918d73Successfully tagged figlet:latestAnd run it:
$ docker run figlet salut _ | | , __, | | _|_ / \_/ | |/ | | | \/ \_/|_/|__/ \_/|_/|_/containers/Cmd_And_Entrypoint.md
Using CMD and ENTRYPOINT together
What if we want to define a default message for our container?
Then we will use ENTRYPOINT and CMD together.
ENTRYPOINTwill define the base command for our container.CMDwill define the default parameter(s) for this command.They both have to use JSON syntax.
containers/Cmd_And_Entrypoint.md
CMD and ENTRYPOINT together
Our new Dockerfile will look like this:
FROM ubuntuRUN apt-get updateRUN ["apt-get", "install", "figlet"]ENTRYPOINT ["figlet", "-f", "script"]CMD ["hello world"]ENTRYPOINTdefines a base command (and its parameters) for the container.If we don't specify extra command-line arguments when starting the container, the value of
CMDis appended.Otherwise, our extra command-line arguments are used instead of
CMD.
containers/Cmd_And_Entrypoint.md
Build and test our image
Let's build it:
$ docker build -t myfiglet ....Successfully built 6e0b6a048a07Successfully tagged myfiglet:latestRun it without parameters:
$ docker run myfiglet _ _ _ _ | | | | | | | | | | | _ | | | | __ __ ,_ | | __| |/ \ |/ |/ |/ / \_ | | |_/ \_/ | |/ / | | |_/|__/|__/|__/\__/ \/ \/ \__/ |_/|__/\_/|_/containers/Cmd_And_Entrypoint.md
Overriding the image default parameters
Now let's pass extra arguments to the image.
$ docker run myfiglet hola mundo _ _ | | | | | | | __ | | __, _ _ _ _ _ __| __ |/ \ / \_|/ / | / |/ |/ | | | / |/ | / | / \_| |_/\__/ |__/\_/|_/ | | |_/ \_/|_/ | |_/\_/|_/\__/We overrode CMD but still used ENTRYPOINT.
containers/Cmd_And_Entrypoint.md
Overriding ENTRYPOINT
What if we want to run a shell in our container?
We cannot just do docker run myfiglet bash because
that would just tell figlet to display the word "bash."
We use the --entrypoint parameter:
$ docker run -it --entrypoint bash myfigletroot@6027e44e2955:/#containers/Cmd_And_Entrypoint.md
CMD and ENTRYPOINT recap
docker run myimageexecutesENTRYPOINT+CMDdocker run myimage argsexecutesENTRYPOINT+args(overridingCMD)docker run --entrypoint prog myimageexecutesprog(overriding both)
| Command | ENTRYPOINT |
CMD |
Result |
|---|---|---|---|
docker run figlet |
none | none | Use values from base image (bash) |
docker run figlet hola |
none | none | Error (executable hola not found) |
docker run figlet |
figlet -f script |
none | figlet -f script |
docker run figlet hola |
figlet -f script |
none | figlet -f script hola |
docker run figlet |
none | figlet -f script |
figlet -f script |
docker run figlet hola |
none | figlet -f script |
Error (executable hola not found) |
docker run figlet |
figlet -f script |
hello |
figlet -f script hello |
docker run figlet hola |
figlet -f script |
hello |
figlet -f script hola |
containers/Cmd_And_Entrypoint.md
When to use ENTRYPOINT vs CMD
ENTRYPOINT is great for "containerized binaries".
Example: docker run consul --help
(Pretend that the docker run part isn't there!)
CMD is great for images with multiple binaries.
Example: docker run busybox ifconfig
(It makes sense to indicate which program we want to run!)
:EN:- CMD and ENTRYPOINT :FR:- CMD et ENTRYPOINT

Copying files during the build
(automatically generated title slide)
Objectives
So far, we have installed things in our container images by downloading packages.
We can also copy files from the build context to the container that we are building.
Remember: the build context is the directory containing the Dockerfile.
In this chapter, we will learn a new Dockerfile keyword: COPY.
containers/Copying_Files_During_Build.md
Build some C code
We want to build a container that compiles a basic "Hello world" program in C.
Here is the program, hello.c:
int main () { puts("Hello, world!"); return 0;}Let's create a new directory, and put this file in there.
Then we will write the Dockerfile.
containers/Copying_Files_During_Build.md
The Dockerfile
On Debian and Ubuntu, the package build-essential will get us a compiler.
When installing it, don't forget to specify the -y flag, otherwise the build will fail (since the build cannot be interactive).
Then we will use COPY to place the source file into the container.
FROM ubuntuRUN apt-get updateRUN apt-get install -y build-essentialCOPY hello.c /RUN make helloCMD /helloCreate this Dockerfile.
containers/Copying_Files_During_Build.md
Testing our C program
Create
hello.candDockerfilein the same directory.Run
docker build -t hello .in this directory.Run
docker run hello, you should seeHello, world!.
Success!
containers/Copying_Files_During_Build.md
COPY and the build cache
Run the build again.
Now, modify
hello.cand run the build again.Docker can cache steps involving
COPY.Those steps will not be executed again if the files haven't been changed.
containers/Copying_Files_During_Build.md
Details
We can
COPYwhole directories recursivelyIt is possible to do e.g.
COPY . .(but it might require some extra precautions to avoid copying too much)
In older Dockerfiles, you might see the
ADDcommand; consider it deprecated(it is similar to
COPYbut can automatically extract archives)If we really wanted to compile C code in a container, we would:
place it in a different directory, with the
WORKDIRinstructioneven better, use the
gccofficial image
containers/Copying_Files_During_Build.md
.dockerignore
We can create a file named
.dockerignore(at the top-level of the build context)
It can contain file names and globs to ignore
They won't be sent to the builder
(and won't end up in the resulting image)
See the documentation for the little details
(exceptions can be made with
!, multiple directory levels with**...)
:EN:- Leveraging the build cache for faster builds :FR:- Tirer parti du cache afin d'optimiser la vitesse de build
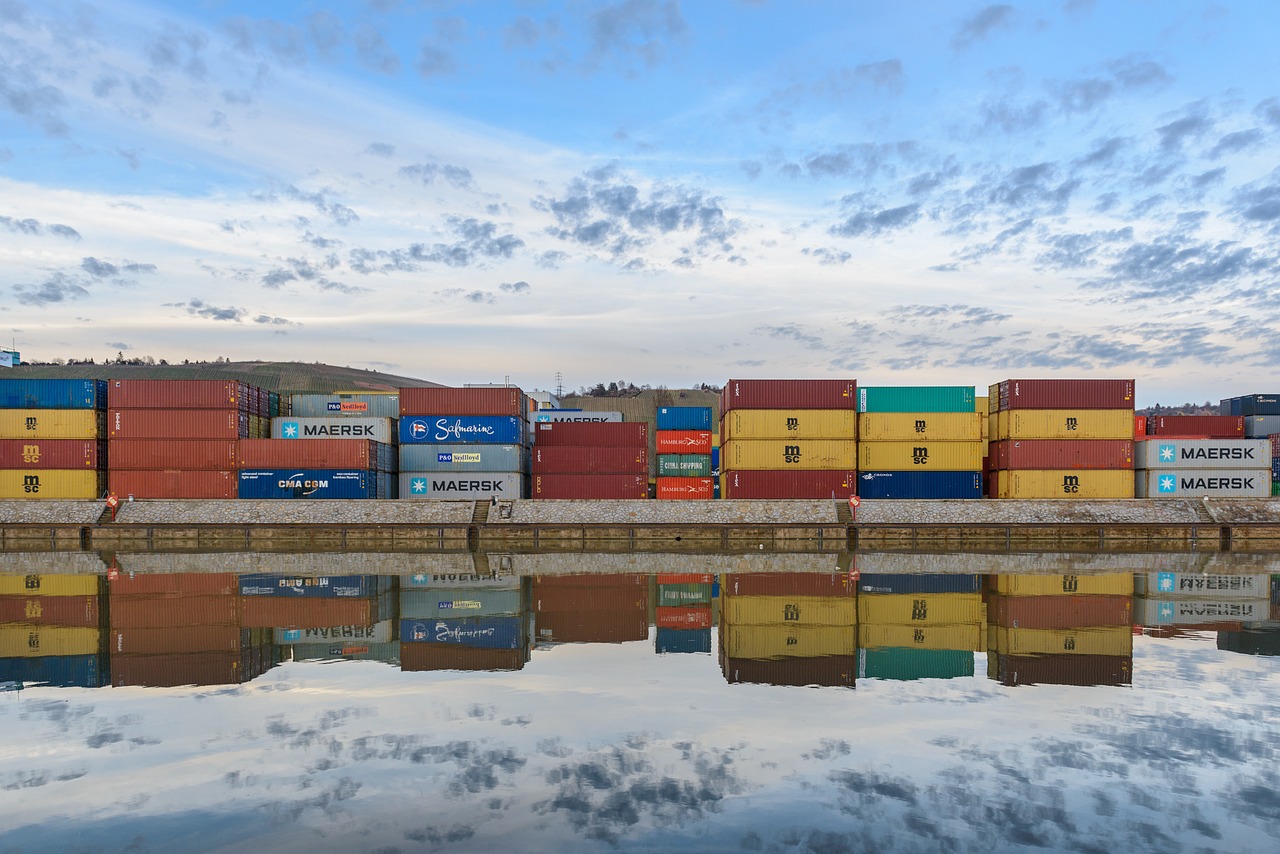
Exercise — writing Dockerfiles
(automatically generated title slide)
Exercise — writing Dockerfiles
Let's write Dockerfiles for an existing application!
Check out the code repository
Read all the instructions
Write Dockerfiles
Build and test them individually
containers/Exercise_Dockerfile_Basic.md
Code repository
Clone the repository available at:
https://github.com/jpetazzo/wordsmith
It should look like this:
├── LICENSE├── README├── db/│ └── words.sql├── web/│ ├── dispatcher.go│ └── static/└── words/ ├── pom.xml └── src/containers/Exercise_Dockerfile_Basic.md
Instructions
The repository contains instructions in English and French.
For now, we only care about the first part (about writing Dockerfiles).
Place each Dockerfile in its own directory, like this:
├── LICENSE├── README├── db/│ ├── Dockerfile│ └── words.sql├── web/│ ├── Dockerfile│ ├── dispatcher.go│ └── static/└── words/ ├── Dockerfile ├── pom.xml └── src/containers/Exercise_Dockerfile_Basic.md
Build and test
Build and run each Dockerfile individually.
For db, we should be able to see some messages confirming that the data set
was loaded successfully (some INSERT lines in the container output).
For web and words, we should be able to see some message looking like
"server started successfully".
That's all we care about for now!
Bonus question: make sure that each container stops correctly when hitting Ctrl-C.
Test with a Compose file
Place the following Compose file at the root of the repository:
version: "3"services: db: build: db words: build: words web: build: web ports: - 8888:80Test the whole app by bringin up the stack and connecting to port 8888.
Done for today. On Friday:
Docker Networking, Docker Compose, & Workflows local Dev & Test
Remember to signup for the Udemy courses (info on front page)
Do the example Dockerfile!
Dig into Bonus Sections

Container networking basics
(automatically generated title slide)
Objectives
We will now run network services (accepting requests) in containers.
At the end of this section, you will be able to:
Run a network service in a container.
Connect to that network service.
Find a container's IP address.
containers/Container_Networking_Basics.md
Running a very simple service
We need something small, simple, easy to configure
(or, even better, that doesn't require any configuration at all)
Let's use the official NGINX image (named
nginx)It runs a static web server listening on port 80
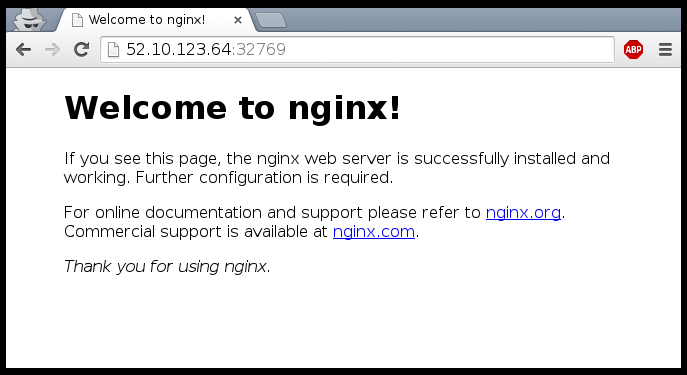
It serves a default "Welcome to nginx!" page
containers/Container_Networking_Basics.md
Running an NGINX server
$ docker run -d -P nginx66b1ce719198711292c8f34f84a7b68c3876cf9f67015e752b94e189d35a204eDocker will automatically pull the
nginximage from the Docker Hub-d/--detachtells Docker to run it in the backgroundP/--publish-alltells Docker to publish all ports(publish = make them reachable from other computers)
...OK, how do we connect to our web server now?
containers/Container_Networking_Basics.md
Finding our web server port
First, we need to find the port number used by Docker
(the NGINX container listens on port 80, but this port will be mapped)
We can use
docker ps:$ docker psCONTAINER ID IMAGE ... PORTS ...e40ffb406c9e nginx ... 0.0.0.0:12345->80/tcp ...This means:
port 12345 on the Docker host is mapped to port 80 in the container
Now we need to connect to the Docker host!
containers/Container_Networking_Basics.md
Finding the address of the Docker host
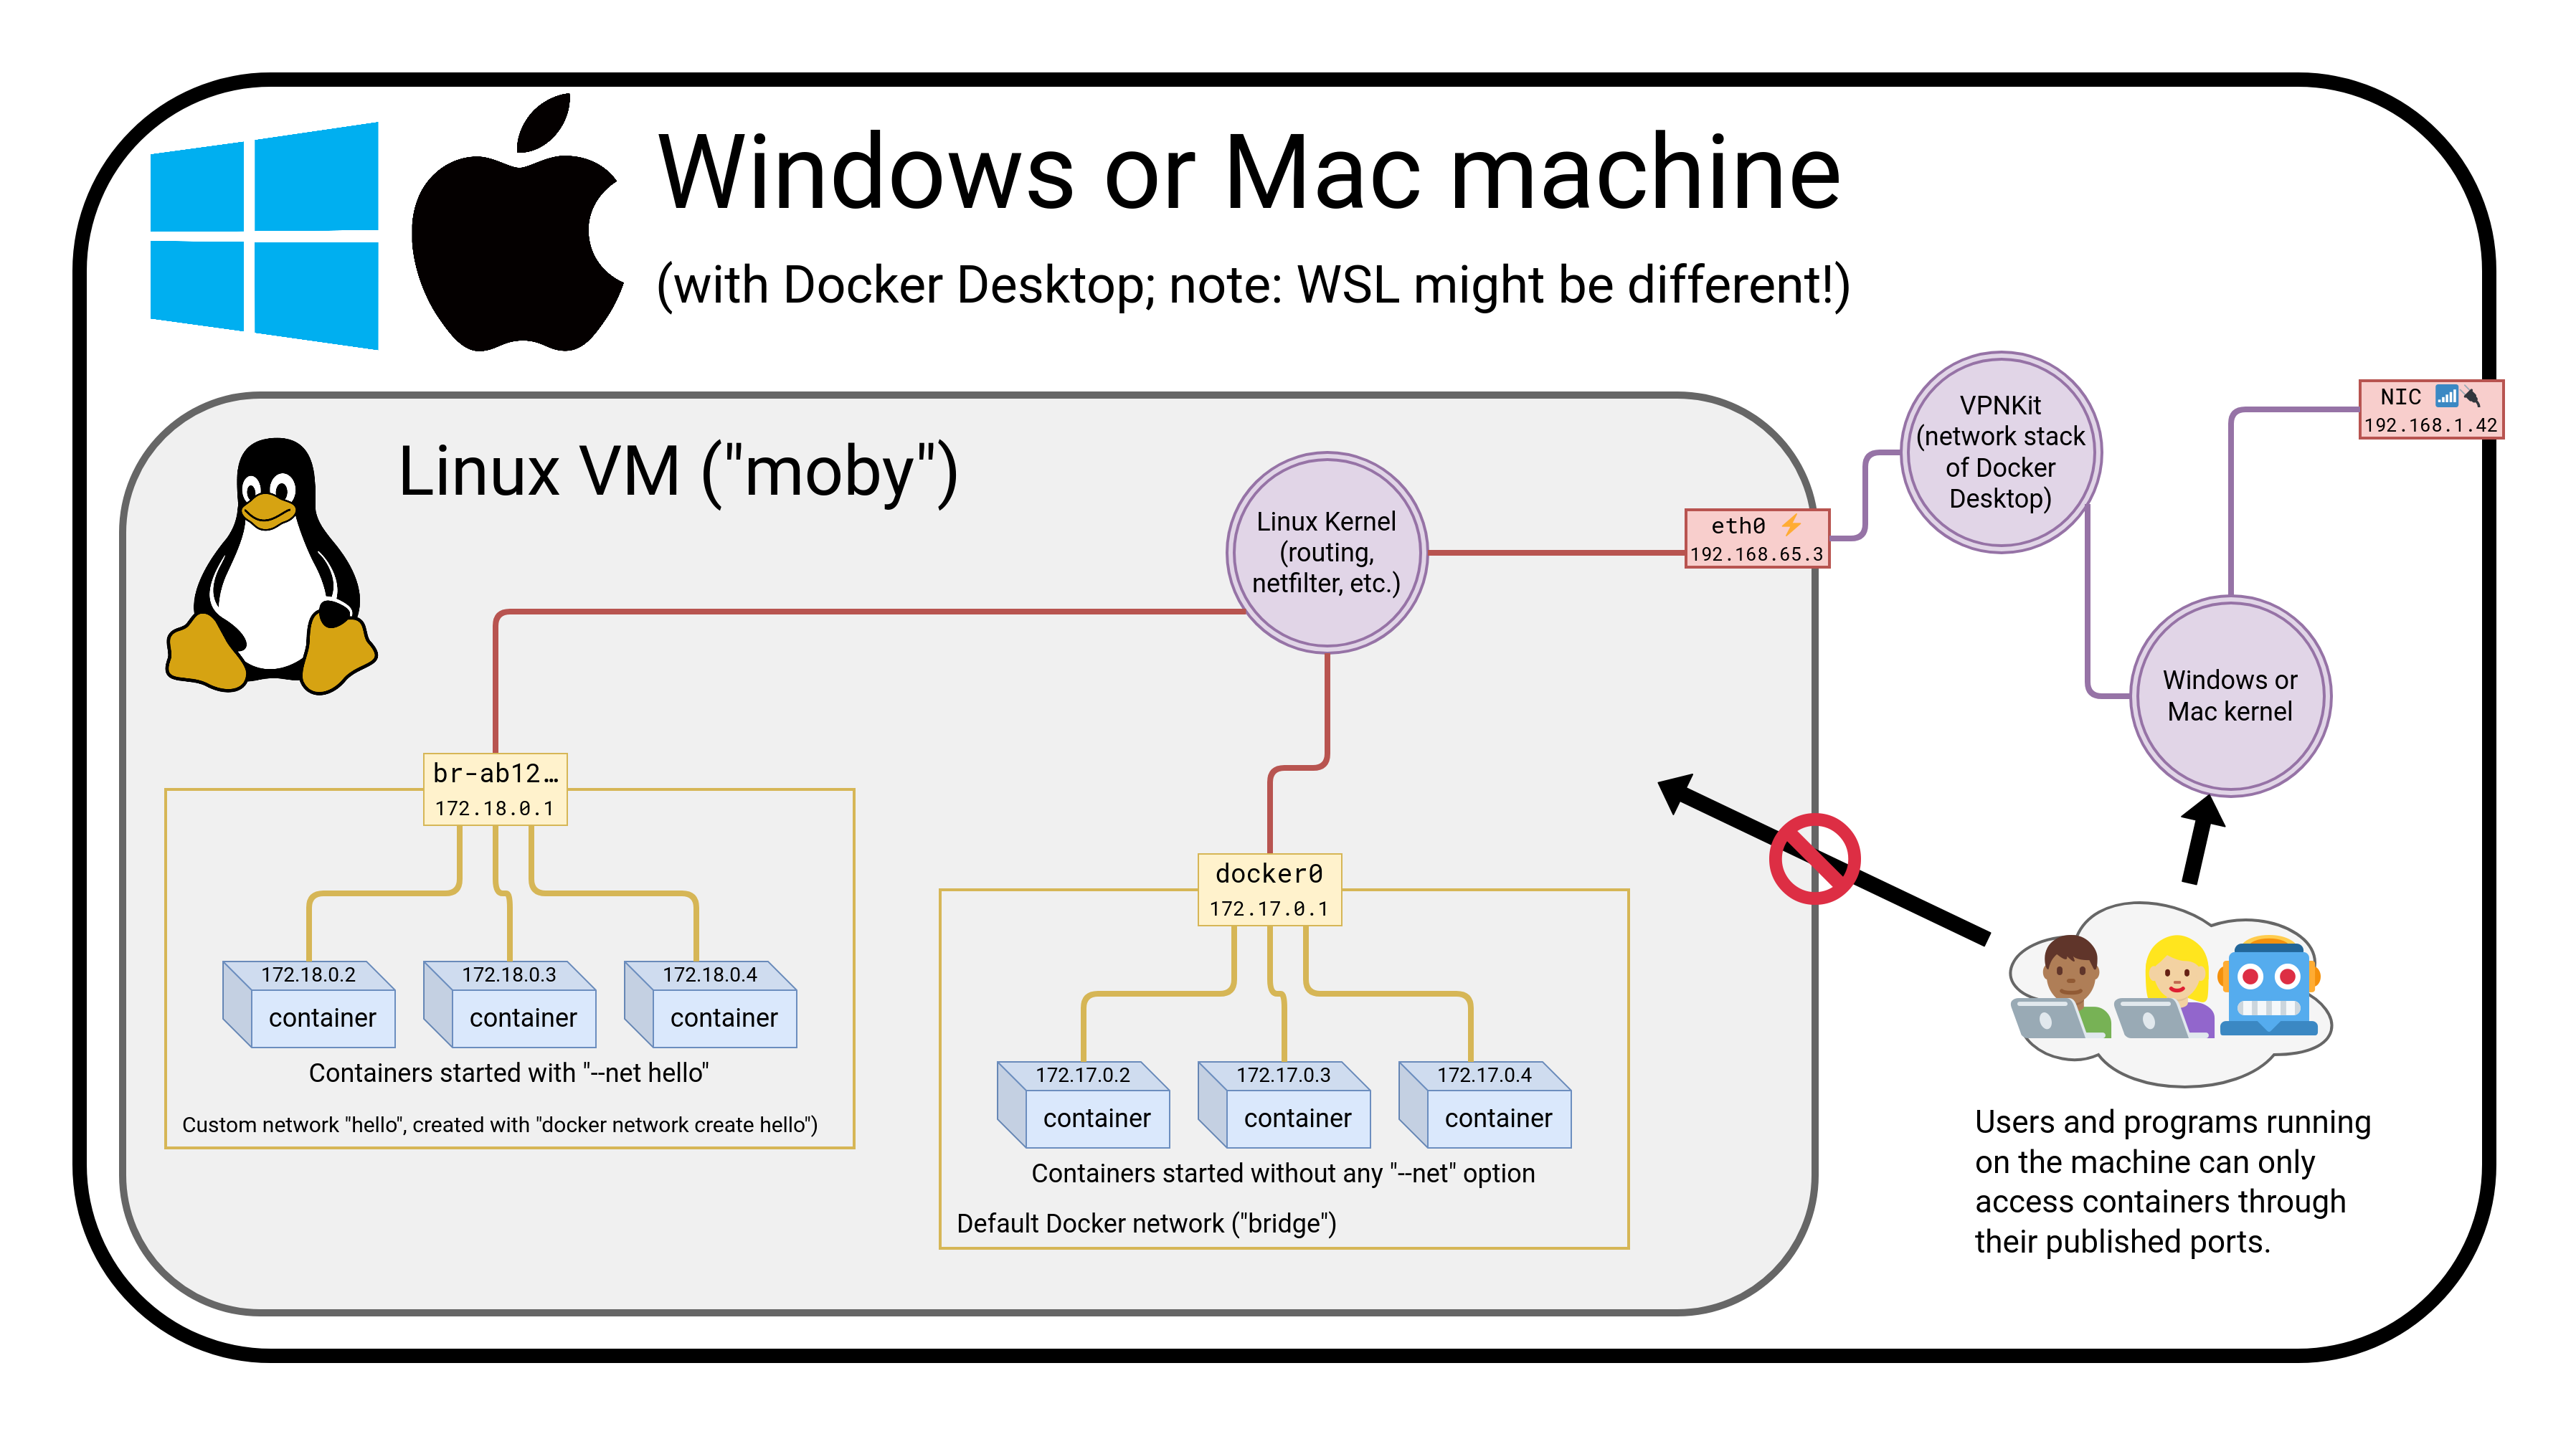
When running Docker on your Linux workstation:
use
localhost, or any IP address of your machineWhen running Docker on a remote Linux server:
use any IP address of the remote machine
When running Docker Desktop on Mac or Windows:
use
localhostIn other scenarios (
docker-machine, local VM...):use the IP address of the Docker VM
containers/Container_Networking_Basics.md
Connecting to our web server (GUI)
Point your browser to the IP address of your Docker host, on the port
shown by docker ps for container port 80.
containers/Container_Networking_Basics.md
Connecting to our web server (CLI)
You can also use curl directly from the Docker host.
Make sure to use the right port number if it is different from the example below:
$ curl localhost:12345<!DOCTYPE html><html><head><title>Welcome to nginx!</title>...containers/Container_Networking_Basics.md
How does Docker know which port to map?
There is metadata in the image telling "this image has something on port 80".
We can see that metadata with
docker inspect:
$ docker inspect --format '{{.Config.ExposedPorts}}' nginxmap[80/tcp:{}]This metadata was set in the Dockerfile, with the
EXPOSEkeyword.We can see that with
docker history:
$ docker history nginxIMAGE CREATED CREATED BY7f70b30f2cc6 11 days ago /bin/sh -c #(nop) CMD ["nginx" "-g" "…<missing> 11 days ago /bin/sh -c #(nop) STOPSIGNAL [SIGTERM]<missing> 11 days ago /bin/sh -c #(nop) EXPOSE 80/tcpcontainers/Container_Networking_Basics.md
Why can't we just connect to port 80?
Our Docker host has only one port 80
Therefore, we can only have one container at a time on port 80
Therefore, if multiple containers want port 80, only one can get it
By default, containers do not get "their" port number, but a random one
(not "random" as "crypto random", but as "it depends on various factors")
We'll see later how to force a port number (including port 80!)
containers/Container_Networking_Basics.md
Using multiple IP addresses
Hey, my network-fu is strong, and I have questions...
Can I publish one container on 127.0.0.2:80, and another on 127.0.0.3:80?
My machine has multiple (public) IP addresses, let's say A.A.A.A and B.B.B.B.
Can I have one container on A.A.A.A:80 and another on B.B.B.B:80?I have a whole IPV4 subnet, can I allocate it to my containers?
What about IPV6?
You can do all these things when running Docker directly on Linux.
(On other platforms, generally not, but there are some exceptions.)
containers/Container_Networking_Basics.md
Finding the web server port in a script
Parsing the output of docker ps would be painful.
There is a command to help us:
$ docker port <containerID> 800.0.0.0:12345containers/Container_Networking_Basics.md
Manual allocation of port numbers
If you want to set port numbers yourself, no problem:
$ docker run -d -p 80:80 nginx$ docker run -d -p 8000:80 nginx$ docker run -d -p 8080:80 -p 8888:80 nginx- We are running three NGINX web servers.
- The first one is exposed on port 80.
- The second one is exposed on port 8000.
- The third one is exposed on ports 8080 and 8888.
Note: the convention is port-on-host:port-on-container.
containers/Container_Networking_Basics.md
Plumbing containers into your infrastructure
There are many ways to integrate containers in your network.
Start the container, letting Docker allocate a public port for it.
Then retrieve that port number and feed it to your configuration.Pick a fixed port number in advance, when you generate your configuration.
Then start your container by setting the port numbers manually.Use an orchestrator like Kubernetes or Swarm.
The orchestrator will provide its own networking facilities.
Orchestrators typically provide mechanisms to enable direct container-to-container communication across hosts, and publishing/load balancing for inbound traffic.
containers/Container_Networking_Basics.md
Finding the container's IP address
We can use the docker inspect command to find the IP address of the
container.
$ docker inspect --format '{{ .NetworkSettings.IPAddress }}' <yourContainerID>172.17.0.3docker inspectis an advanced command, that can retrieve a ton of information about our containers.Here, we provide it with a format string to extract exactly the private IP address of the container.
containers/Container_Networking_Basics.md
Pinging our container
Let's try to ping our container from another container.
docker run alpine ping <ipaddress>PING 172.17.0.X (172.17.0.X): 56 data bytes64 bytes from 172.17.0.X: seq=0 ttl=64 time=0.106 ms64 bytes from 172.17.0.X: seq=1 ttl=64 time=0.250 ms64 bytes from 172.17.0.X: seq=2 ttl=64 time=0.188 msWhen running on Linux, we can even ping that IP address directly!
(And connect to a container's ports even if they aren't published.)
containers/Container_Networking_Basics.md
How often do we use -p and -P ?
When running a stack of containers, we will often use Compose
Compose will take care of exposing containers
(through a
ports:section in thedocker-compose.ymlfile)It is, however, fairly common to use
docker run -Pfor a quick testOr
docker run -p ...when an image doesn'tEXPOSEa port correctly
containers/Container_Networking_Basics.md
Section summary
We've learned how to:
Expose a network port.
Connect to an application running in a container.
Find a container's IP address.
:EN:- Exposing single containers :FR:- Exposer un conteneur isolé

The Container Network Model
(automatically generated title slide)
Objectives
We will learn about the CNM (Container Network Model).
At the end of this lesson, you will be able to:
Create a private network for a group of containers.
Use container naming to connect services together.
Dynamically connect and disconnect containers to networks.
Set the IP address of a container.
We will also explain the principle of overlay networks and network plugins.
containers/Container_Network_Model.md
The Container Network Model
Docker has "networks".
We can manage them with the docker network commands; for instance:
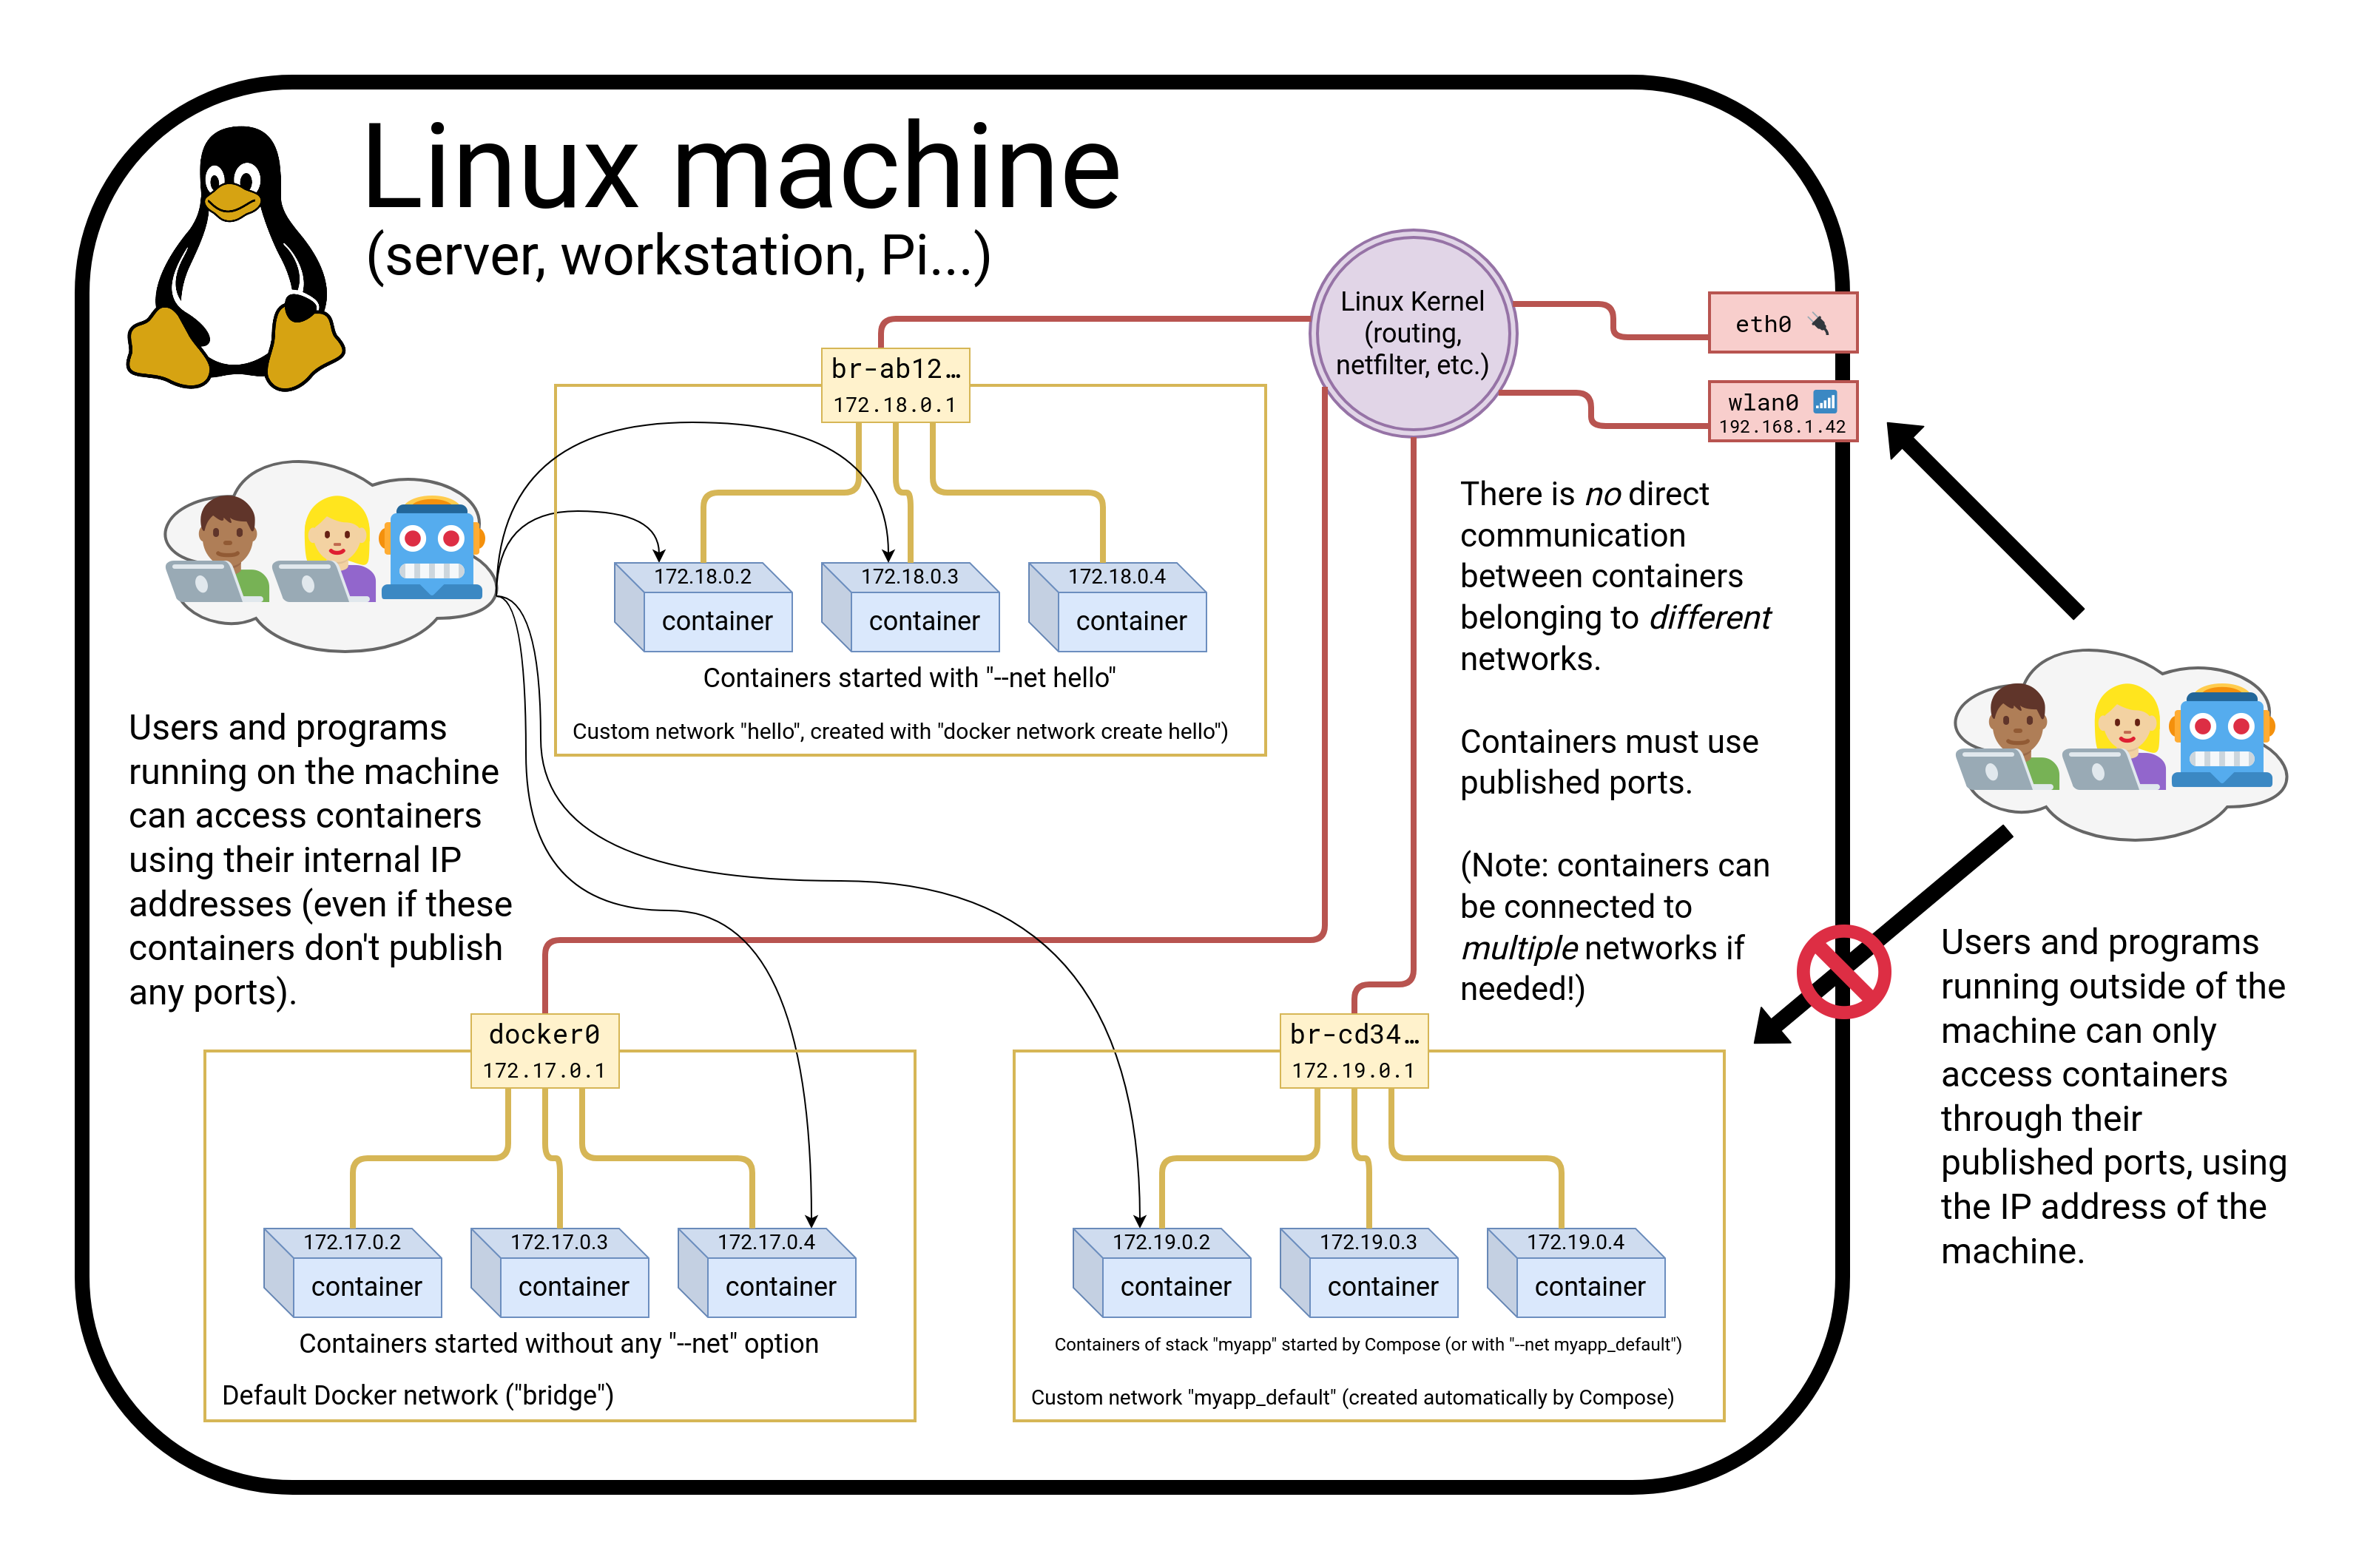
$ docker network lsNETWORK ID NAME DRIVER6bde79dfcf70 bridge bridge8d9c78725538 none nulleb0eeab782f4 host host4c1ff84d6d3f blog-dev overlay228a4355d548 blog-prod overlayNew networks can be created (with docker network create).
(Note: networks none and host are special; let's set them aside for now.)
containers/Container_Network_Model.md
What's a network?
Conceptually, a Docker "network" is a virtual switch
(we can also think about it like a VLAN, or a WiFi SSID, for instance)
By default, containers are connected to a single network
(but they can be connected to zero, or many networks, even dynamically)
Each network has its own subnet (IP address range)
A network can be local (to a single Docker Engine) or global (span multiple hosts)
Containers can have network aliases providing DNS-based service discovery
(and each network has its own "domain", "zone", or "scope")
containers/Container_Network_Model.md
Service discovery
A container can be given a network alias
(e.g. with
docker run --net some-network --net-alias db ...)The containers running in the same network can resolve that network alias
(i.e. if they do a DNS lookup on
db, it will give the container's address)We can have a different
dbcontainer in each network(this avoids naming conflicts between different stacks)
When we name a container, it automatically adds the name as a network alias
(i.e.
docker run --name xyz ...is likedocker run --net-alias xyz ...
containers/Container_Network_Model.md
Network isolation
Networks are isolated
By default, containers in network A cannot reach those in network B
A container connected to both networks A and B can act as a router or proxy
Published ports are always reachable through the Docker host address
(
docker run -P ...makes a container port available to everyone)
containers/Container_Network_Model.md
How to use networks
We typically create one network per "stack" or app that we deploy
More complex apps or stacks might require multiple networks
(e.g.
frontend,backend, ...)Networks allow us to deploy multiple copies of the same stack
(e.g.
prod,dev,pr-442, ....)If we use Docker Compose, this is managed automatically for us
containers/Container_Network_Model.md
CNM vs CNI
CNM is the model used by Docker
Kubernetes uses a different model, architectured around CNI
(CNI is a kind of API between a container engine and CNI plugins)
Docker model:
- multiple isolated networks
- per-network service discovery
- network interconnection requires extra steps
Kubernetes model:
- single flat network
- per-namespace service discovery
- network isolation requires extra steps (Network Policies)
containers/Container_Network_Model.md
Creating a network
Let's create a network called dev.
$ docker network create dev4c1ff84d6d3f1733d3e233ee039cac276f425a9d5228a4355d54878293a889baThe network is now visible with the network ls command:
$ docker network lsNETWORK ID NAME DRIVER6bde79dfcf70 bridge bridge8d9c78725538 none nulleb0eeab782f4 host host4c1ff84d6d3f dev bridgecontainers/Container_Network_Model.md
Placing containers on a network
We will create a named container on this network.
It will be reachable with its name, es.
$ docker run -d --name es --net dev elasticsearch:28abb80e229ce8926c7223beb69699f5f34d6f1d438bfc5682db893e798046863containers/Container_Network_Model.md
Communication between containers
Now, create another container on this network.
$ docker run -ti --net dev alpine shroot@0ecccdfa45ef:/#From this new container, we can resolve and ping the other one, using its assigned name:
/ # ping esPING es (172.18.0.2) 56(84) bytes of data.64 bytes from es.dev (172.18.0.2): icmp_seq=1 ttl=64 time=0.221 ms64 bytes from es.dev (172.18.0.2): icmp_seq=2 ttl=64 time=0.114 ms64 bytes from es.dev (172.18.0.2): icmp_seq=3 ttl=64 time=0.114 ms^C--- es ping statistics ---3 packets transmitted, 3 received, 0% packet loss, time 2000msrtt min/avg/max/mdev = 0.114/0.149/0.221/0.052 msroot@0ecccdfa45ef:/#containers/Container_Network_Model.md
Resolving container addresses
Since Docker Engine 1.10, name resolution is implemented by a dynamic resolver.
Archeological note: when CNM was intoduced (in Docker Engine 1.9, November 2015)
name resolution was implemented with /etc/hosts, and it was updated each time
CONTAINERs were added/removed. This could cause interesting race conditions
since /etc/hosts was a bind-mount (and couldn't be updated atomically).
[root@0ecccdfa45ef /]# cat /etc/hosts172.18.0.3 0ecccdfa45ef127.0.0.1 localhost::1 localhost ip6-localhost ip6-loopbackfe00::0 ip6-localnetff00::0 ip6-mcastprefixff02::1 ip6-allnodesff02::2 ip6-allrouters172.18.0.2 es172.18.0.2 es.devcontainers/Container_Network_Model.md
Service discovery with containers
(automatically generated title slide)
Service discovery with containers
Let's try to run an application that requires two containers.
The first container is a web server.
The other one is a redis data store.
We will place them both on the
devnetwork created before.
containers/Container_Network_Model.md
Running the web server
The application is provided by the container image
jpetazzo/trainingwheels.We don't know much about it so we will try to run it and see what happens!
Start the container, exposing all its ports:
$ docker run --net dev -d -P jpetazzo/trainingwheelsCheck the port that has been allocated to it:
$ docker ps -lcontainers/Container_Network_Model.md
Test the web server
- If we connect to the application now, we will see an error page:
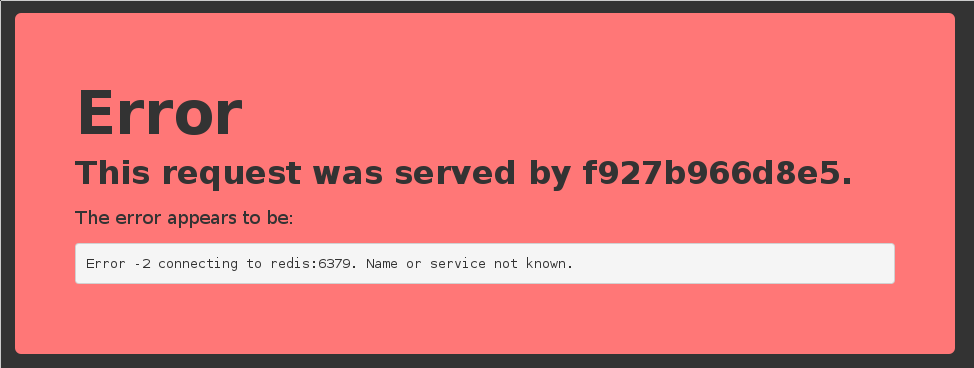
- This is because the Redis service is not running.
- This container tries to resolve the name
redis.
Note: we're not using a FQDN or an IP address here; just redis.
containers/Container_Network_Model.md
Start the data store
We need to start a Redis container.
That container must be on the same network as the web server.
It must have the right network alias (
redis) so the application can find it.
Start the container:
$ docker run --net dev --net-alias redis -d rediscontainers/Container_Network_Model.md
Test the web server again
- If we connect to the application now, we should see that the app is working correctly:
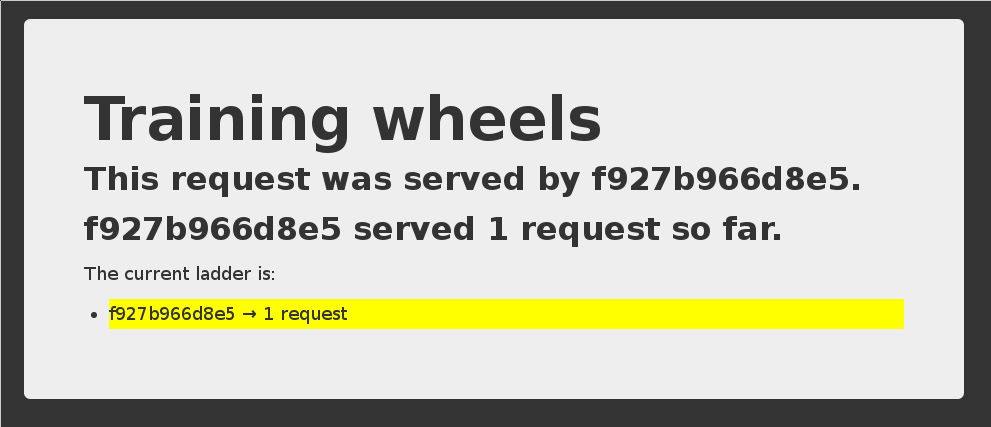
- When the app tries to resolve
redis, instead of getting a DNS error, it gets the IP address of our Redis container.
containers/Container_Network_Model.md
A few words on scope
Container names are unique (there can be only one
--name redis)Network aliases are not unique
We can have the same network alias in different networks:
docker run --net dev --net-alias redis ...docker run --net prod --net-alias redis ...We can even have multiple containers with the same alias in the same network
(in that case, we get multiple DNS entries, aka "DNS round robin")
containers/Container_Network_Model.md
Names are local to each network
Let's try to ping our es container from another container, when that other container is not on the dev network.
$ docker run --rm alpine ping esping: bad address 'es'Names can be resolved only when containers are on the same network.
Containers can contact each other only when they are on the same network (you can try to ping using the IP address to verify).
containers/Container_Network_Model.md
Network aliases
We would like to have another network, prod, with its own es container. But there can be only one container named es!
We will use network aliases.
A container can have multiple network aliases.
Network aliases are local to a given network (only exist in this network).
Multiple containers can have the same network alias (even on the same network).
Since Docker Engine 1.11, resolving a network alias yields the IP addresses of all containers holding this alias.
containers/Container_Network_Model.md
Creating containers on another network
Create the prod network.
$ docker network create prod5a41562fecf2d8f115bedc16865f7336232a04268bdf2bd816aecca01b68d50cWe can now create multiple containers with the es alias on the new prod network.
$ docker run -d --name prod-es-1 --net-alias es --net prod elasticsearch:238079d21caf0c5533a391700d9e9e920724e89200083df73211081c8a356d771$ docker run -d --name prod-es-2 --net-alias es --net prod elasticsearch:21820087a9c600f43159688050dcc164c298183e1d2e62d5694fd46b10ac3bc3dcontainers/Container_Network_Model.md
Resolving network aliases
Let's try DNS resolution first, using the nslookup tool that ships with the alpine image.
$ docker run --net prod --rm alpine nslookup es.Name: esAddress 1: 172.23.0.3 prod-es-2.prodAddress 2: 172.23.0.2 prod-es-1.prod(You can ignore the can't resolve '(null)' errors.)
containers/Container_Network_Model.md
Connecting to aliased containers
Each ElasticSearch instance has a name (generated when it is started). This name can be seen when we issue a simple HTTP request on the ElasticSearch API endpoint.
Try the following command a few times:
$ docker run --rm --net dev centos curl -s es:9200{ "name" : "Tarot",...}Then try it a few times by replacing --net dev with --net prod:
$ docker run --rm --net prod centos curl -s es:9200{ "name" : "The Symbiote",...}containers/Container_Network_Model.md
Good to know ...
Docker will not create network names and aliases on the default
bridgenetwork.Therefore, if you want to use those features, you have to create a custom network first.
Network aliases are not unique on a given network.
i.e., multiple containers can have the same alias on the same network.
In that scenario, the Docker DNS server will return multiple records.
(i.e. you will get DNS round robin out of the box.)Enabling Swarm Mode gives access to clustering and load balancing with IPVS.
Creation of networks and network aliases is generally automated with tools like Compose.
containers/Container_Network_Model.md
A few words about round robin DNS
Don't rely exclusively on round robin DNS to achieve load balancing.
Many factors can affect DNS resolution, and you might see:
- all traffic going to a single instance;
- traffic being split (unevenly) between some instances;
- different behavior depending on your application language;
- different behavior depending on your base distro;
- different behavior depending on other factors (sic).
It's OK to use DNS to discover available endpoints, but remember that you have to re-resolve every now and then to discover new endpoints.
containers/Container_Network_Model.md
Custom networks
When creating a network, extra options can be provided.
--internaldisables outbound traffic (the network won't have a default gateway).--gatewayindicates which address to use for the gateway (when outbound traffic is allowed).--subnet(in CIDR notation) indicates the subnet to use.--ip-range(in CIDR notation) indicates the subnet to allocate from.--aux-addressallows specifying a list of reserved addresses (which won't be allocated to containers).
containers/Container_Network_Model.md
Setting containers' IP address
- It is possible to set a container's address with
--ip. - The IP address has to be within the subnet used for the container.
A full example would look like this.
$ docker network create --subnet 10.66.0.0/16 pubnet42fb16ec412383db6289a3e39c3c0224f395d7f85bcb1859b279e7a564d4e135$ docker run --net pubnet --ip 10.66.66.66 -d nginxb2887adeb5578a01fd9c55c435cad56bbbe802350711d2743691f95743680b09Note: don't hard code container IP addresses in your code!
I repeat: don't hard code container IP addresses in your code!
containers/Container_Network_Model.md
Network drivers
A network is managed by a driver.
The built-in drivers include:
bridge(default)nonehostmacvlanoverlay(for Swarm clusters)
More drivers can be provided by plugins (OVS, VLAN...)
A network can have a custom IPAM (IP allocator).
containers/Container_Network_Model.md
Overlay networks
The features we've seen so far only work when all containers are on a single host.
If containers span multiple hosts, we need an overlay network to connect them together.
Docker ships with a default network plugin,
overlay, implementing an overlay network leveraging VXLAN, enabled with Swarm Mode.Other plugins (Weave, Calico...) can provide overlay networks as well.
Once you have an overlay network, all the features that we've used in this chapter work identically across multiple hosts.
containers/Container_Network_Model.md
Multi-host networking (overlay)
Out of the scope for this intro-level workshop!
Very short instructions:
- enable Swarm Mode (
docker swarm initthendocker swarm joinon other nodes) docker network create mynet --driver overlaydocker service create --network mynet myimage
If you want to learn more about Swarm mode, you can check this video or these slides.
containers/Container_Network_Model.md
Multi-host networking (plugins)
Out of the scope for this intro-level workshop!
General idea:
install the plugin (they often ship within containers)
run the plugin (if it's in a container, it will often require extra parameters; don't just
docker runit blindly!)some plugins require configuration or activation (creating a special file that tells Docker "use the plugin whose control socket is at the following location")
you can then
docker network create --driver pluginname
containers/Container_Network_Model.md
Connecting and disconnecting dynamically
So far, we have specified which network to use when starting the container.
The Docker Engine also allows connecting and disconnecting while the container is running.
This feature is exposed through the Docker API, and through two Docker CLI commands:
docker network connect <network> <container>docker network disconnect <network> <container>
containers/Container_Network_Model.md
Dynamically connecting to a network
We have a container named
esconnected to a network nameddev.Let's start a simple alpine container on the default network:
$ docker run -ti alpine sh/ #In this container, try to ping the
escontainer:/ # ping esping: bad address 'es'This doesn't work, but we will change that by connecting the container.
containers/Container_Network_Model.md
Finding the container ID and connecting it
Figure out the ID of our alpine container; here are two methods:
looking at
/etc/hostnamein the container,running
docker ps -lqon the host.
Run the following command on the host:
$ docker network connect dev <container_id>
containers/Container_Network_Model.md
Checking what we did
Try again to
ping esfrom the container.It should now work correctly:
/ # ping esPING es (172.20.0.3): 56 data bytes64 bytes from 172.20.0.3: seq=0 ttl=64 time=0.376 ms64 bytes from 172.20.0.3: seq=1 ttl=64 time=0.130 ms^CInterrupt it with Ctrl-C.
containers/Container_Network_Model.md
Looking at the network setup in the container
We can look at the list of network interfaces with ifconfig, ip a, or ip l:
/ # ip a1: lo: <LOOPBACK,UP,LOWER_UP> mtu 65536 qdisc noqueue state UNKNOWN qlen 1000 link/loopback 00:00:00:00:00:00 brd 00:00:00:00:00:00 inet 127.0.0.1/8 scope host lo valid_lft forever preferred_lft forever18: eth0@if19: <BROADCAST,MULTICAST,UP,LOWER_UP,M-DOWN> mtu 1500 qdisc noqueue state UP link/ether 02:42:ac:11:00:02 brd ff:ff:ff:ff:ff:ff inet 172.17.0.2/16 brd 172.17.255.255 scope global eth0 valid_lft forever preferred_lft forever20: eth1@if21: <BROADCAST,MULTICAST,UP,LOWER_UP,M-DOWN> mtu 1500 qdisc noqueue state UP link/ether 02:42:ac:14:00:04 brd ff:ff:ff:ff:ff:ff inet 172.20.0.4/16 brd 172.20.255.255 scope global eth1 valid_lft forever preferred_lft forever/ #Each network connection is materialized with a virtual network interface.
As we can see, we can be connected to multiple networks at the same time.
containers/Container_Network_Model.md
Disconnecting from a network
Let's try the symmetrical command to disconnect the container:
$ docker network disconnect dev <container_id>From now on, if we try to ping
es, it will not resolve:/ # ping esping: bad address 'es'Trying to ping the IP address directly won't work either:
/ # ping 172.20.0.3... (nothing happens until we interrupt it with Ctrl-C)
containers/Container_Network_Model.md
Network aliases are scoped per network
Each network has its own set of network aliases.
We saw this earlier:
esresolves to different addresses indevandprod.If we are connected to multiple networks, the resolver looks up names in each of them (as of Docker Engine 18.03, it is the connection order) and stops as soon as the name is found.
Therefore, if we are connected to both
devandprod, resolvingeswill not give us the addresses of all theesservices; but only the ones indevorprod.However, we can lookup
es.devores.prodif we need to.
containers/Container_Network_Model.md
Finding out about our networks and names
We can do reverse DNS lookups on containers' IP addresses.
If the IP address belongs to a network (other than the default bridge), the result will be:
name-or-first-alias-or-container-id.network-nameExample:
$ docker run -ti --net prod --net-alias hello alpine/ # apk add --no-cache drill...OK: 5 MiB in 13 packages/ # ifconfigeth0 Link encap:Ethernet HWaddr 02:42:AC:15:00:03 inet addr:172.21.0.3 Bcast:172.21.255.255 Mask:255.255.0.0 UP BROADCAST RUNNING MULTICAST MTU:1500 Metric:1.../ # drill -t ptr 3.0.21.172.in-addr.arpa...;; ANSWER SECTION:3.0.21.172.in-addr.arpa. 600 IN PTR hello.prod....containers/Container_Network_Model.md
Building with a custom network
We can build a Dockerfile with a custom network with
docker build --network NAME.This can be used to check that a build doesn't access the network.
(But keep in mind that most Dockerfiles will fail,
because they need to install remote packages and dependencies!)This may be used to access an internal package repository.
(But try to use a multi-stage build instead, if possible!)
:EN:Container networking essentials :EN:- The Container Network Model :EN:- Container isolation :EN:- Service discovery
:FR:Mettre ses conteneurs en réseau :FR:- Le "Container Network Model" :FR:- Isolation des conteneurs :FR:- Service discovery

Local development workflow with Docker
(automatically generated title slide)
Objectives
At the end of this section, you will be able to:
Share code between container and host.
Use a simple local development workflow.
containers/Local_Development_Workflow.md
Local development in a container
We want to solve the following issues:
"Works on my machine"
"Not the same version"
"Missing dependency"
By using Docker containers, we will get a consistent development environment.
containers/Local_Development_Workflow.md
Working on the "namer" application
We have to work on some application whose code is at:
What is it? We don't know yet!
Let's download the code.
$ git clone https://github.com/bretfisher/namercontainers/Local_Development_Workflow.md
Looking at the code
$ cd namer$ ls -1company_name_generator.rbconfig.rudocker-compose.ymlDockerfileGemfileLooking at the code
$ cd namer$ ls -1company_name_generator.rbconfig.rudocker-compose.ymlDockerfileGemfileAha, a Gemfile! This is Ruby. Probably. We know this. Maybe?
containers/Local_Development_Workflow.md
Looking at the Dockerfile
FROM rubyCOPY . /srcWORKDIR /srcRUN bundler installCMD ["rackup", "--host", "0.0.0.0"]EXPOSE 9292- This application is using a base
rubyimage. - The code is copied in
/src. - Dependencies are installed with
bundler. - The application is started with
rackup. - It is listening on port 9292.
containers/Local_Development_Workflow.md
Building and running the "namer" application
- Let's build the application with the
Dockerfile!
Building and running the "namer" application
- Let's build the application with the
Dockerfile!
$ docker build -t namer .Building and running the "namer" application
- Let's build the application with the
Dockerfile!
$ docker build -t namer .- Then run it. We need to expose its ports.
Building and running the "namer" application
- Let's build the application with the
Dockerfile!
$ docker build -t namer .- Then run it. We need to expose its ports.
$ docker run -dP namerBuilding and running the "namer" application
- Let's build the application with the
Dockerfile!
$ docker build -t namer .- Then run it. We need to expose its ports.
$ docker run -dP namer- Check on which port the container is listening.
Building and running the "namer" application
- Let's build the application with the
Dockerfile!
$ docker build -t namer .- Then run it. We need to expose its ports.
$ docker run -dP namer- Check on which port the container is listening.
$ docker ps -lcontainers/Local_Development_Workflow.md
Connecting to our application
- Point our browser to our Docker node, on the port allocated to the container.
Connecting to our application
Point our browser to our Docker node, on the port allocated to the container.
Hit "reload" a few times.
Connecting to our application
Point our browser to our Docker node, on the port allocated to the container.
Hit "reload" a few times.
This is an enterprise-class, carrier-grade, ISO-compliant company name generator!
(With 50% more b.s. than the average competition!)
(Wait, was that 50% more, or 50% less? Anyway!)
containers/Local_Development_Workflow.md
Making changes to the code
Option 1:
- Edit the code locally
- Rebuild the image
- Re-run the container
Option 2:
- Enter the container (with
docker exec) - Install an editor
- Make changes from within the container
Option 3:
- Use a bind mount to share local files with the container
- Make changes locally
- Changes are reflected in the container
containers/Local_Development_Workflow.md
Our first volume
We will tell Docker to map the current directory to /src in the container.
$ docker run -d -v $(pwd):/src -P namer-d: the container should run in detached mode (in the background).-v: the following host directory should be mounted inside the container.-P: publish all the ports exposed by this image.nameris the name of the image we will run.We don't specify a command to run because it is already set in the Dockerfile via
CMD.
Note: on Windows, replace $(pwd) with %cd% (or ${pwd} if you use PowerShell).
containers/Local_Development_Workflow.md
Mounting volumes inside containers
The -v flag mounts a directory from your host into your Docker container.
The flag structure is:
[host-path]:[container-path]:[rw|ro][host-path]and[container-path]are created if they don't exist.You can control the write status of the volume with the
roandrwoptions.If you don't specify
rworro, it will berwby default.
containers/Local_Development_Workflow.md
Hold your horses... and your mounts
The
-v /path/on/host:/path/in/containersyntax is the "old" syntaxThe modern syntax looks like this:
--mount type=bind,source=/path/on/host,target=/path/in/container--mountis more explicit, but-vis quicker to type--mountsupports all mount types;-vdoesn't supporttmpfsmounts--mountfails if the path on the host doesn't exist;-vcreates it
With the new syntax, our command becomes:
docker run --mount=type=bind,source=$(pwd),target=/src -dP namercontainers/Local_Development_Workflow.md
Testing the development container
- Check the port used by our new container.
$ docker ps -lCONTAINER ID IMAGE COMMAND CREATED STATUS PORTS NAMES045885b68bc5 namer rackup 3 seconds ago Up ... 0.0.0.0:32770->9292/tcp ...- Open the application in your web browser.
containers/Local_Development_Workflow.md
Making a change to our application
Our customer really doesn't like the color of our text. Let's change it.
$ vi company_name_generator.rbAnd change
color: royalblue;To:
color: red;containers/Local_Development_Workflow.md
Viewing our changes
- Reload the application in our browser.
Viewing our changes
Reload the application in our browser.
The color should have changed.
containers/Local_Development_Workflow.md
Understanding volumes
Volumes are not copying or synchronizing files between the host and the container
Changes made in the host are immediately visible in the container (and vice versa)
When running on Linux:
volumes and bind mounts correspond to directories on the host
if Docker runs in a Linux VM, these directories are in the Linux VM
When running on Docker Desktop:
volumes correspond to directories in a small Linux VM running Docker
access to bind mounts is translated to host filesystem access
(a bit like a network filesystem)
containers/Local_Development_Workflow.md
Docker Desktop caveats
When running Docker natively on Linux, accessing a mount = native I/O
When running Docker Desktop, accessing a bind mount = file access translation
That file access translation has relatively good performance in general
(watch out, however, for that big
npm installworking on a bind mount!)There are some corner cases when watching files (with mechanisms like inotify)
Features like "live reload" or programs like
entrdon't always behave properly(due to e.g. file attribute caching, and other interesting details!)
containers/Local_Development_Workflow.md
Trash your servers and burn your code
(This is the title of a 2013 blog post by Chad Fowler, where he explains the concept of immutable infrastructure.)
Trash your servers and burn your code
(This is the title of a 2013 blog post by Chad Fowler, where he explains the concept of immutable infrastructure.)
Let's majorly mess up our container.
(Remove files or whatever.)
Now, how can we fix this?
Trash your servers and burn your code
(This is the title of a 2013 blog post by Chad Fowler, where he explains the concept of immutable infrastructure.)
Let's majorly mess up our container.
(Remove files or whatever.)
Now, how can we fix this?
Our old container (with the blue version of the code) is still running.
See on which port it is exposed:
docker psPoint our browser to it to confirm that it still works fine.
containers/Local_Development_Workflow.md
Immutable infrastructure in a nutshell
Instead of updating a server, we deploy a new one.
This might be challenging with classical servers, but it's trivial with containers.
In fact, with Docker, the most logical workflow is to build a new image and run it.
If something goes wrong with the new image, we can always restart the old one.
We can even keep both versions running side by side.
If this pattern sounds interesting, you might want to read about blue/green deployment and canary deployments.
containers/Local_Development_Workflow.md
Recap of the development workflow
Write a Dockerfile to build an image containing our development environment.
(Rails, Django, ... and all the dependencies for our app)Start a container from that image.
Use the-vflag to mount our source code inside the container.Edit the source code outside the container, using familiar tools.
(vim, emacs, textmate...)Test the application.
(Some frameworks pick up changes automatically.
Others require you to Ctrl-C + restart after each modification.)Iterate and repeat steps 3 and 4 until satisfied.
When done, commit+push source code changes.
containers/Local_Development_Workflow.md
Debugging inside the container
Docker has a command called docker exec.
It allows users to run a new process in a container which is already running.
If sometimes you find yourself wishing you could SSH into a container: you can use docker exec instead.
You can get a shell prompt inside an existing container this way, or run an arbitrary process for automation.
containers/Local_Development_Workflow.md
docker exec example
$ # You can run ruby commands in the area the app is running and more!$ docker exec -it <yourContainerId> bashroot@5ca27cf74c2e:/opt/namer# irbirb(main):001:0> [0, 1, 2, 3, 4].map {|x| x ** 2}.compact=> [0, 1, 4, 9, 16]irb(main):002:0> exitcontainers/Local_Development_Workflow.md
Stopping the container
Now that we're done let's stop our container.
$ docker stop <yourContainerID>And remove it.
$ docker rm <yourContainerID>containers/Local_Development_Workflow.md
Section summary
We've learned how to:
Share code between container and host.
Set our working directory.
Use a simple local development workflow.
:EN:Developing with containers :EN:- “Containerize” a development environment
:FR:Développer au jour le jour :FR:- « Containeriser » son environnement de développement

Compose for development stacks
(automatically generated title slide)
Compose for development stacks
Dockerfile = great to build one container image.
What if we have multiple containers?
What if some of them require particular docker run parameters?
How do we connect them all together?
... Compose solves these use-cases (and a few more).
containers/Compose_For_Dev_Stacks.md
Life before Compose
Before we had Compose, we would typically write custom scripts to:
build container images,
run containers using these images,
connect the containers together,
rebuild, restart, update these images and containers.
containers/Compose_For_Dev_Stacks.md
Life with Compose
Compose enables a simple, powerful onboarding workflow:
Checkout our code.
Run
docker compose up.Our app is up and running!
containers/Compose_For_Dev_Stacks.md
Life after Compose
(Or: when do we need something else?)
Compose is not an orchestrator
It isn't designed to need to run containers on multiple nodes
(it can, however, work with Docker Swarm Mode)
Compose isn't ideal if we want to run containers on Kubernetes
it uses different concepts (Compose services ≠ Kubernetes services)
it needs a Docker Engine (although containerd support might be coming)
there are projects to convert Compose files, like Kompose and Podman
containers/Compose_For_Dev_Stacks.md
First rodeo with Compose
Write Dockerfiles
Describe our stack of containers in a YAML file called
docker-compose.ymldocker compose up(ordocker compose up -dto run in the background)Compose pulls and builds the required images, and starts the containers
Compose shows the combined logs of all the containers
(if running in the background, use
docker compose logs)Hit Ctrl-C to stop the whole stack
(if running in the background, use
docker compose stop)
containers/Compose_For_Dev_Stacks.md
Iterating
After making changes to our source code, we can:
docker compose buildto rebuild container imagesdocker compose upto restart the stack with the new images
We can also combine both with docker compose up --build
Compose will be smart, and only recreate the containers that have changed.
When working with interpreted languages:
don't rebuild each time
leverage a
volumessection instead
containers/Compose_For_Dev_Stacks.md
Launching Our First Stack with Compose
First step: clone the source code for the app we will be working on.
git clone https://github.com/bretfisher/trainingwheelscd trainingwheelsSecond step: start the app.
docker compose upWatch Compose build and run the app.
That Compose stack exposes a web server on port 8000; try connecting to it.
containers/Compose_For_Dev_Stacks.md
Launching Our First Stack with Compose
We should see a web page like this:
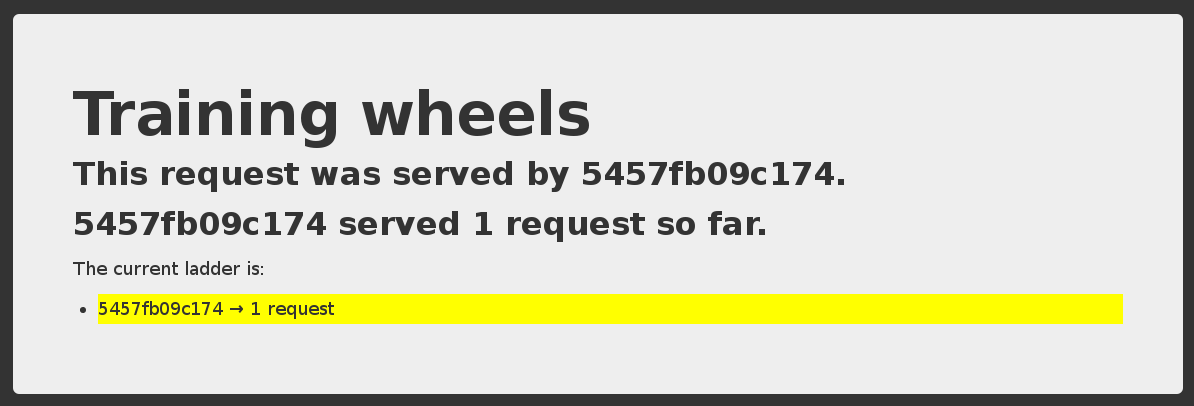
Each time we reload, the counter should increase.
containers/Compose_For_Dev_Stacks.md
Stopping the app
When we hit Ctrl-C, Compose tries to gracefully terminate all of the containers.
After ten seconds (or if we press ^C again) it will forcibly kill them.
containers/Compose_For_Dev_Stacks.md
The (short) history of Docker Compose
2013-2015, "fig" was created in Python by a small team outside Docker.
2015, Docker hired them, and renamed fig to Docker Compose.
It's CLI,
docker-compose, reigned as the easiest tool for running containers with YAML.But, it was a separate
pipinstall, and was not Go (golang) like every other Docker tool.2020, Docker rebuilt it in Go, making it faster and easier to install.
They call it Compose V2, and it has many new features (video walk-through)
Replace all your
docker-composekeystrokes withdocker compose.It should have 100% backward compatibility. containers/Compose_For_Dev_Stacks.md
The docker-compose.yml file
Here is the file used in the demo:
services: www: build: www ports: - ${PORT-8000}:5000 user: nobody environment: DEBUG: 1 command: python counter.py volumes: - ./www:/src redis: image: rediscontainers/Compose_For_Dev_Stacks.md
Compose file structure
A Compose file has multiple sections:
servicesis mandatory. Each service corresponds to one or more containers from the same image (replicas).networksis optional and indicates to which networks containers should be connected.
(By default, containers will be connected on a private, per-compose-file network.)volumesis optional and can define volumes to be used and/or shared by the containers.
containers/Compose_For_Dev_Stacks.md
The History of Compose file versions
Until 2020, Compose files has a
version: x.xkey/value in each file.The version in the file controlled what features were supported, and it was confusing.
The last version was 3.9, so you might see
version: 3.xin olddocker-compose.yml.Now, the
docker composeCLI, and other tools, follow the Compose Spec.All features are now supported in every file and no version is required!
If using Docker Swarm, version: 3.9 is still required. It doesn't support Compose Spec.
Note, this isn't related to tool versions, like docker compose version.
The Docker documentation has excellent information about the Compose file format if you need to know more about versions.
Containers in docker-compose.yml
Each service in the YAML file must contain either build, or image.
buildindicates a path containing a Dockerfile.imageindicates an image name (local, or on a registry).If both are specified, an image will be built from the
builddirectory and namedimage.
The other parameters are optional.
They encode the parameters that you would typically add to docker run.
Sometimes they have several minor improvements.
containers/Compose_For_Dev_Stacks.md
Container parameters
commandindicates what to run (likeCMDin a Dockerfile).portstranslates to one (or multiple)-poptions to map ports.
You can specify local ports (i.e.x:yto expose public portx).volumestranslates to one (or multiple)-voptions.
You can use relative paths here.
Bookmark this reference doc! https://docs.docker.com/compose/compose-file/
containers/Compose_For_Dev_Stacks.md
Environment variables
We can use environment variables in Compose files
(like
$THISor${THAT})We can provide default values, e.g.
${PORT-8000}Compose will also automatically load the environment file
.env(it should contain
VAR=value, one per line)This is a great way to customize build and run parameters
(base image versions to use, build and run secrets, port numbers...)
containers/Compose_For_Dev_Stacks.md
Configuring a Compose stack
Follow 12-factor app configuration principles
(configure the app through environment variables)
Provide (in the repo) a default environment file suitable for development
(no secret or sensitive value)
Copy the default environment file to
.envand tweak it(or: provide a script to generate
.envfrom a template) containers/Compose_For_Dev_Stacks.md
Running multiple copies of a stack
Copy the stack in two different directories, e.g.
frontandfrontcopyCompose prefixes images and containers with the directory name:
front_www,front_www_1,front_db_1frontcopy_www,frontcopy_www_1,frontcopy_db_1Alternatively, use
docker compose -p frontcopy(to set the
--project-nameof a stack, which default to the dir name)Each copy is isolated from the others (runs on a different network)
containers/Compose_For_Dev_Stacks.md
Checking stack status
We have ps, docker ps, and similarly, docker compose ps:
$ docker compose psName Command State Ports ----------------------------------------------------------------------------trainingwheels_redis_1 /entrypoint.sh red Up 6379/tcp trainingwheels_www_1 python counter.py Up 0.0.0.0:8000->5000/tcpShows the status of all the containers of our stack.
Doesn't show the other containers.
containers/Compose_For_Dev_Stacks.md
Cleaning up (1)
If you have started your application in the background with Compose and
want to stop it easily, you can use the kill command:
$ docker compose killLikewise, docker compose rm will let you remove containers (after confirmation):
$ docker compose rmGoing to remove trainingwheels_redis_1, trainingwheels_www_1Are you sure? [yN] yRemoving trainingwheels_redis_1...Removing trainingwheels_www_1...containers/Compose_For_Dev_Stacks.md
Cleaning up (2)
Alternatively, docker compose down will stop and remove containers.
It will also remove other resources, like networks that were created for the application.
$ docker compose downStopping trainingwheels_www_1 ... doneStopping trainingwheels_redis_1 ... doneRemoving trainingwheels_www_1 ... doneRemoving trainingwheels_redis_1 ... doneUse docker compose down -v to remove everything including volumes.
containers/Compose_For_Dev_Stacks.md
Special handling of volumes
When an image gets updated, Compose automatically creates a new container
The data in the old container is lost...
...Except if the container is using a volume
Compose will then re-attach that volume to the new container
(and data is then retained across database upgrades)
All good database images use volumes
(e.g. all official images)
containers/Compose_For_Dev_Stacks.md
Gotchas with volumes
Unfortunately, Docker volumes don't have labels or metadata
Compose tracks volumes thanks to their associated container
If the container is deleted, the volume gets orphaned
Example:
docker compose down && docker compose upthe old volume still exists, detached from its container
a new volume gets created
docker compose down -v/--volumesdeletes volumes(but not
docker compose down && docker compose down -v!)
containers/Compose_For_Dev_Stacks.md
Managing volumes explicitly
Option 1: named volumes
services: app: volumes: - data:/some/pathvolumes: data:Volume will be named
<project>_dataIt won't be orphaned with
docker compose downIt will correctly be removed with
docker compose down -v
containers/Compose_For_Dev_Stacks.md
Managing volumes explicitly
Option 2: relative paths
services: app: volumes: - ./data:/some/pathMakes it easy to colocate the app and its data
(for migration, backups, disk usage accounting...)
Won't be removed by
docker compose down -v
containers/Compose_For_Dev_Stacks.md
Managing complex stacks
Compose provides multiple features to manage complex stacks
(with many containers)
-f/--file/$COMPOSE_FILEcan be a list of Compose files(separated by
:and merged together)Services can be assigned to one or more profiles
--profile/$COMPOSE_PROFILEcan be a list of comma-separated profiles(see Using service profiles in the Compose documentation)
These variables can be set in
.envcontainers/Compose_For_Dev_Stacks.md
Dependencies
A service can have a
depends_onsection(listing one or more other services)
This is used when bringing up individual services
(e.g.
docker compose up blahordocker compose run foo)It can even wait for a service to be up and ready for connections (healthy)
services: node: depends_on: db: condition: service_healthy db: image: postgres healthcheck: test: /healthchecks/postgres-healthcheckcontainers/Compose_For_Dev_Stacks.md

Exercise — writing a Compose file
(automatically generated title slide)
Exercise — writing a Compose file
Let's write a Compose file for the wordsmith app!
The code is at: https://github.com/jpetazzo/wordsmith
containers/Exercise_Composefile.md

(Extra Docker content)
(automatically generated title slide)

Tips for efficient Dockerfiles
(automatically generated title slide)
Tips for efficient Dockerfiles
We will see how to:
Reduce the number of layers.
Leverage the build cache so that builds can be faster.
Embed unit testing in the build process.
Reducing the number of layers
Each line in a
Dockerfilecreates a new layer.Build your
Dockerfileto take advantage of Docker's caching system.Combine commands by using
&&to continue commands and\to wrap lines.
Note: it is frequent to build a Dockerfile line by line:
RUN apt-get install thisthingRUN apt-get install andthatthing andthatotheroneRUN apt-get install somemorestuffAnd then refactor it trivially before shipping:
RUN apt-get install thisthing andthatthing andthatotherone somemorestuffAvoid re-installing dependencies at each build
Classic Dockerfile problem:
"each time I change a line of code, all my dependencies are re-installed!"
Solution:
COPYdependency lists (package.json,requirements.txt, etc.) by themselves to avoid reinstalling unchanged dependencies every time.
Example "bad" Dockerfile
The dependencies are reinstalled every time, because the build system does not know if requirements.txt has been updated.
FROM pythonWORKDIR /srcCOPY . .RUN pip install -qr requirements.txtEXPOSE 5000CMD ["python", "app.py"]Fixed Dockerfile
Adding the dependencies as a separate step means that Docker can cache more efficiently and only install them when requirements.txt changes.
FROM pythonWORKDIR /srcCOPY requirements.txt .RUN pip install -qr requirements.txtCOPY . .EXPOSE 5000CMD ["python", "app.py"]Be careful with chown, chmod, mv
Layers cannot store efficiently changes in permissions or ownership.
Layers cannot represent efficiently when a file is moved either.
As a result, operations like
chown,chown,mvcan be expensive.For instance, in the Dockerfile snippet below, each
RUNline creates a layer with an entire copy ofsome-file.COPY some-file .RUN chown www-data:www-data some-fileRUN chmod 644 some-fileRUN mv some-file /var/wwwHow can we avoid that?
Put files on the right place
Instead of using
mv, directly put files at the right place.When extracting archives (tar, zip...), merge operations in a single layer.
Example:
...RUN wget http://.../foo.tar.gz \&& tar -zxf foo.tar.gz \&& mv foo/fooctl /usr/local/bin \&& rm -rf foo foo.tar.gz...
Use COPY --chown
The Dockerfile instruction
COPYcan take a--chownparameter.Examples:
...COPY --chown=1000 some-file .COPY --chown=1000:1000 some-file .COPY --chown=www-data:www-data some-file .The
--chownflag can specify a user, or a user:group pair.The user and group can be specified as names or numbers.
When using names, the names must exist in
/etc/passwdor/etc/group.(In the container, not on the host!)
Set correct permissions locally
Instead of using
chmod, set the right file permissions locally.When files are copied with
COPY, permissions are preserved.
Embedding unit tests in the build process
FROM <baseimage>RUN <install dependencies>COPY <code>RUN <build code>RUN <install test dependencies>COPY <test data sets and fixtures>RUN <unit tests>FROM <baseimage>RUN <install dependencies>COPY <code>RUN <build code>CMD, EXPOSE ...- The build fails as soon as an instruction fails
- If
RUN <unit tests>fails, the build doesn't produce an image - If it succeeds, it produces a clean image (without test libraries and data)

Dockerfile examples
(automatically generated title slide)
Dockerfile examples
There are a number of tips, tricks, and techniques that we can use in Dockerfiles.
But sometimes, we have to use different (and even opposed) practices depending on:
the complexity of our project,
the programming language or framework that we are using,
the stage of our project (early MVP vs. super-stable production),
whether we're building a final image or a base for further images,
etc.
We are going to show a few examples using very different techniques.
When to optimize an image
When authoring official images, it is a good idea to reduce as much as possible:
the number of layers,
the size of the final image.
This is often done at the expense of build time and convenience for the image maintainer; but when an image is downloaded millions of time, saving even a few seconds of pull time can be worth it.
RUN apt-get update && apt-get install -y libpng12-dev libjpeg-dev && rm -rf /var/lib/apt/lists/* \ && docker-php-ext-configure gd --with-png-dir=/usr --with-jpeg-dir=/usr \ && docker-php-ext-install gd...RUN curl -o wordpress.tar.gz -SL https://wordpress.org/wordpress-${WORDPRESS_UPSTREAM_VERSION}.tar.gz \ && echo "$WORDPRESS_SHA1 *wordpress.tar.gz" | sha1sum -c - \ && tar -xzf wordpress.tar.gz -C /usr/src/ \ && rm wordpress.tar.gz \ && chown -R www-data:www-data /usr/src/wordpress(Source: Wordpress official image)
When to not optimize an image
Sometimes, it is better to prioritize maintainer convenience.
In particular, if:
the image changes a lot,
the image has very few users (e.g. only 1, the maintainer!),
the image is built and run on the same machine,
the image is built and run on machines with a very fast link ...
In these cases, just keep things simple!
(Next slide: a Dockerfile that can be used to preview a Jekyll / github pages site.)
FROM debian:sidRUN apt-get update -qRUN apt-get install -yq build-essential makeRUN apt-get install -yq zlib1g-devRUN apt-get install -yq ruby ruby-devRUN apt-get install -yq python-pygmentsRUN apt-get install -yq nodejsRUN apt-get install -yq cmakeRUN gem install --no-rdoc --no-ri github-pagesCOPY . /blogWORKDIR /blogVOLUME /blog/_siteEXPOSE 4000CMD ["jekyll", "serve", "--host", "0.0.0.0", "--incremental"]Multi-dimensional versioning systems
Images can have a tag, indicating the version of the image.
But sometimes, there are multiple important components, and we need to indicate the versions for all of them.
This can be done with environment variables:
ENV PIP=9.0.3 \ ZC_BUILDOUT=2.11.2 \ SETUPTOOLS=38.7.0 \ PLONE_MAJOR=5.1 \ PLONE_VERSION=5.1.0 \ PLONE_MD5=76dc6cfc1c749d763c32fff3a9870d8d(Source: Plone official image)
Entrypoints and wrappers
It is very common to define a custom entrypoint.
That entrypoint will generally be a script, performing any combination of:
pre-flights checks (if a required dependency is not available, display a nice error message early instead of an obscure one in a deep log file),
generation or validation of configuration files,
dropping privileges (with e.g.
suorgosu, sometimes combined withchown),and more.
A typical entrypoint script
#!/bin/sh set -e # first arg is '-f' or '--some-option' # or first arg is 'something.conf' if [ "${1#-}" != "$1" ] || [ "${1%.conf}" != "$1" ]; then set -- redis-server "$@" fi # allow the container to be started with '--user' if [ "$1" = 'redis-server' -a "$(id -u)" = '0' ]; then chown -R redis . exec su-exec redis "$0" "$@" fi exec "$@"(Source: Redis official image)
Factoring information
To facilitate maintenance (and avoid human errors), avoid to repeat information like:
version numbers,
remote asset URLs (e.g. source tarballs) ...
Instead, use environment variables.
ENV NODE_VERSION 10.2.1...RUN ... && curl -fsSLO --compressed "https://nodejs.org/dist/v$NODE_VERSION/node-v$NODE_VERSION.tar.xz" \ && curl -fsSLO --compressed "https://nodejs.org/dist/v$NODE_VERSION/SHASUMS256.txt.asc" \ && gpg --batch --decrypt --output SHASUMS256.txt SHASUMS256.txt.asc \ && grep " node-v$NODE_VERSION.tar.xz\$" SHASUMS256.txt | sha256sum -c - \ && tar -xf "node-v$NODE_VERSION.tar.xz" \ && cd "node-v$NODE_VERSION" \...(Source: Nodejs official image)
Overrides
In theory, development and production images should be the same.
In practice, we often need to enable specific behaviors in development (e.g. debug statements).
One way to reconcile both needs is to use Compose to enable these behaviors.
Let's look at the trainingwheels demo app for an example.
Production image
This Dockerfile builds an image leveraging gunicorn:
FROM pythonRUN pip install flaskRUN pip install gunicornRUN pip install redisCOPY . /srcWORKDIR /srcCMD gunicorn --bind 0.0.0.0:5000 --workers 10 counter:appEXPOSE 5000(Source: trainingwheels Dockerfile)
Development Compose file
This Compose file uses the same image, but with a few overrides for development:
the Flask development server is used (overriding
CMD),the
DEBUGenvironment variable is set,a volume is used to provide a faster local development workflow.
services: www: build: www ports: - 8000:5000 user: nobody environment: DEBUG: 1 command: python counter.py volumes: - ./www:/src(Source: trainingwheels Compose file)
How to know which best practices are better?
The main goal of containers is to make our lives easier.
In this chapter, we showed many ways to write Dockerfiles.
These Dockerfiles use sometimes diametrically opposed techniques.
Yet, they were the "right" ones for a specific situation.
It's OK (and even encouraged) to start simple and evolve as needed.
Feel free to review this chapter later (after writing a few Dockerfiles) for inspiration!
:EN:Optimizing images :EN:- Dockerfile tips, tricks, and best practices :EN:- Reducing build time :EN:- Reducing image size
:FR:Optimiser ses images :FR:- Bonnes pratiques, trucs et astuces :FR:- Réduire le temps de build :FR:- Réduire la taille des images

Reducing image size
(automatically generated title slide)
Reducing image size
In the previous example, our final image contained:
our
helloprogramits source code
the compiler
Only the first one is strictly necessary.
We are going to see how to obtain an image without the superfluous components.
containers/Multi_Stage_Builds.md
Can't we remove superfluous files with RUN?
What happens if we do one of the following commands?
RUN rm -rf ...RUN apt-get remove ...RUN make clean ...
Can't we remove superfluous files with RUN?
What happens if we do one of the following commands?
RUN rm -rf ...RUN apt-get remove ...RUN make clean ...
This adds a layer which removes a bunch of files.
But the previous layers (which added the files) still exist.
containers/Multi_Stage_Builds.md
Removing files with an extra layer
When downloading an image, all the layers must be downloaded.
| Dockerfile instruction | Layer size | Image size |
|---|---|---|
FROM ubuntu |
Size of base image | Size of base image |
... |
... | Sum of this layer + all previous ones |
RUN apt-get install somepackage |
Size of files added (e.g. a few MB) |
Sum of this layer + all previous ones |
... |
... | Sum of this layer + all previous ones |
RUN apt-get remove somepackage |
Almost zero (just metadata) |
Same as previous one |
Therefore, RUN rm does not reduce the size of the image or free up disk space.
containers/Multi_Stage_Builds.md
Removing unnecessary files
Various techniques are available to obtain smaller images:
collapsing layers,
adding binaries that are built outside of the Dockerfile,
squashing the final image,
multi-stage builds.
Let's review them quickly.
containers/Multi_Stage_Builds.md
Collapsing layers
You will frequently see Dockerfiles like this:
FROM ubuntuRUN apt-get update && apt-get install xxx && ... && apt-get remove xxx && ...Or the (more readable) variant:
FROM ubuntuRUN apt-get update \ && apt-get install xxx \ && ... \ && apt-get remove xxx \ && ...This RUN command gives us a single layer.
The files that are added, then removed in the same layer, do not grow the layer size.
containers/Multi_Stage_Builds.md
Collapsing layers: pros and cons
Pros:
works on all versions of Docker
doesn't require extra tools
Cons:
not very readable
some unnecessary files might still remain if the cleanup is not thorough
that layer is expensive (slow to build)
containers/Multi_Stage_Builds.md
Building binaries outside of the Dockerfile
This results in a Dockerfile looking like this:
FROM ubuntuCOPY xxx /usr/local/binOf course, this implies that the file xxx exists in the build context.
That file has to exist before you can run docker build.
For instance, it can:
- exist in the code repository,
- be created by another tool (script, Makefile...),
- be created by another container image and extracted from the image.
See for instance the busybox official image or this older busybox image.
containers/Multi_Stage_Builds.md
Building binaries outside: pros and cons
Pros:
- final image can be very small
Cons:
requires an extra build tool
we're back in dependency hell and "works on my machine"
Cons, if binary is added to code repository:
breaks portability across different platforms
grows repository size a lot if the binary is updated frequently
containers/Multi_Stage_Builds.md
Squashing the final image
The idea is to transform the final image into a single-layer image.
This can be done in (at least) two ways.
Activate experimental features and squash the final image:
docker image build --squash ...Export/import the final image.
docker build -t temp-image .docker run --entrypoint true --name temp-container temp-imagedocker export temp-container | docker import - final-imagedocker rm temp-containerdocker rmi temp-image
containers/Multi_Stage_Builds.md
Squashing the image: pros and cons
Pros:
single-layer images are smaller and faster to download
removed files no longer take up storage and network resources
Cons:
we still need to actively remove unnecessary files
squash operation can take a lot of time (on big images)
squash operation does not benefit from cache
(even if we change just a tiny file, the whole image needs to be re-squashed)
containers/Multi_Stage_Builds.md
Multi-stage builds
Multi-stage builds allow us to have multiple stages.
Each stage is a separate image, and can copy files from previous stages.
We're going to see how they work in more detail.
containers/Multi_Stage_Builds.md

Multi-stage builds
(automatically generated title slide)
Multi-stage builds
At any point in our
Dockerfile, we can add a newFROMline.This line starts a new stage of our build.
Each stage can access the files of the previous stages with
COPY --from=....When a build is tagged (with
docker build -t ...), the last stage is tagged.Previous stages are not discarded: they will be used for caching, and can be referenced.
containers/Multi_Stage_Builds.md
Multi-stage builds in practice
Each stage is numbered, starting at
0We can copy a file from a previous stage by indicating its number, e.g.:
COPY --from=0 /file/from/first/stage /location/in/current/stageWe can also name stages, and reference these names:
FROM golang AS builderRUN ...FROM alpineCOPY --from=builder /go/bin/mylittlebinary /usr/local/bin/
containers/Multi_Stage_Builds.md
Multi-stage builds for our C program
We will change our Dockerfile to:
give a nickname to the first stage:
compileradd a second stage using the same
ubuntubase imageadd the
hellobinary to the second stagemake sure that
CMDis in the second stage
The resulting Dockerfile is on the next slide.
containers/Multi_Stage_Builds.md
Multi-stage build Dockerfile
Here is the final Dockerfile:
FROM ubuntu AS compilerRUN apt-get updateRUN apt-get install -y build-essentialCOPY hello.c /RUN make helloFROM ubuntuCOPY --from=compiler /hello /helloCMD /helloLet's build it, and check that it works correctly:
docker build -t hellomultistage .docker run hellomultistagecontainers/Multi_Stage_Builds.md
Comparing single/multi-stage build image sizes
List our images with docker images, and check the size of:
the
ubuntubase image,the single-stage
helloimage,the multi-stage
hellomultistageimage.
We can achieve even smaller images if we use smaller base images.
However, if we use common base images (e.g. if we standardize on ubuntu),
these common images will be pulled only once per node, so they are
virtually "free."
containers/Multi_Stage_Builds.md
Build targets
We can also tag an intermediary stage with the following command:
docker build --target STAGE --tag NAMEThis will create an image (named
NAME) corresponding to stageSTAGEThis can be used to easily access an intermediary stage for inspection
(instead of parsing the output of
docker buildto find out the image ID)This can also be used to describe multiple images from a single Dockerfile
(instead of using multiple Dockerfiles, which could go out of sync)
:EN:Optimizing our images and their build process :EN:- Leveraging multi-stage builds
:FR:Optimiser les images et leur construction :FR:- Utilisation d'un multi-stage build

Exercise — writing better Dockerfiles
(automatically generated title slide)
Exercise — writing better Dockerfiles
Let's update our Dockerfiles to leverage multi-stage builds!
The code is at: https://github.com/jpetazzo/wordsmith
Use a different tag for these images, so that we can compare their sizes.
What's the size difference between single-stage and multi-stage builds?
containers/Exercise_Dockerfile_Advanced.md

Getting inside a container
(automatically generated title slide)
Objectives
On a traditional server or VM, we sometimes need to:
log into the machine (with SSH or on the console),
analyze the disks (by removing them or rebooting with a rescue system).
In this chapter, we will see how to do that with containers.
Getting a shell
Every once in a while, we want to log into a machine.
In an perfect world, this shouldn't be necessary.
You need to install or update packages (and their configuration)?
Use configuration management. (e.g. Ansible, Chef, Puppet, Salt...)
You need to view logs and metrics?
Collect and access them through a centralized platform.
In the real world, though ... we often need shell access!
Not getting a shell
Even without a perfect deployment system, we can do many operations without getting a shell.
Installing packages can (and should) be done in the container image.
Configuration can be done at the image level, or when the container starts.
Dynamic configuration can be stored in a volume (shared with another container).
Logs written to stdout are automatically collected by the Docker Engine.
Other logs can be written to a shared volume.
Process information and metrics are visible from the host.
Let's save logging, volumes ... for later, but let's have a look at process information!
Viewing container processes from the host
If you run Docker on Linux, container processes are visible on the host.
$ ps faux | lessScroll around the output of this command.
You should see the
jpetazzo/clockcontainer.A containerized process is just like any other process on the host.
We can use tools like
lsof,strace,gdb... To analyze them.
What's the difference between a container process and a host process?
Each process (containerized or not) belongs to namespaces and cgroups.
The namespaces and cgroups determine what a process can "see" and "do".
Analogy: each process (containerized or not) runs with a specific UID (user ID).
UID=0 is root, and has elevated privileges. Other UIDs are normal users.
We will give more details about namespaces and cgroups later.
Getting a shell in a running container
Sometimes, we need to get a shell anyway.
We could run some SSH server in the container ...
But it is easier to use
docker exec.
$ docker exec -ti ticktock shThis creates a new process (running
sh) inside the container.This can also be done "manually" with the tool
nsenter.
Caveats
The tool that you want to run needs to exist in the container.
Some tools (like
ip netns exec) let you attach to one namespace at a time.(This lets you e.g. setup network interfaces, even if you don't have
ifconfigoripin the container.)Most importantly: the container needs to be running.
What if the container is stopped or crashed?
Getting a shell in a stopped container
A stopped container is only storage (like a disk drive).
We cannot SSH into a disk drive or USB stick!
We need to connect the disk to a running machine.
How does that translate into the container world?
Analyzing a stopped container
As an exercise, we are going to try to find out what's wrong with jpetazzo/crashtest.
docker run jpetazzo/crashtestThe container starts, but then stops immediately, without any output.
What would MacGyver™ do?
First, let's check the status of that container.
docker ps -lViewing filesystem changes
- We can use
docker diffto see files that were added / changed / removed.
docker diff <container_id>The container ID was shown by
docker ps -l.We can also see it with
docker ps -lq.The output of
docker diffshows some interesting log files!
Accessing files
- We can extract files with
docker cp.
docker cp <container_id>:/var/log/nginx/error.log .- Then we can look at that log file.
cat error.log(The directory /run/nginx doesn't exist.)
Exploring a crashed container
We can restart a container with
docker start...... But it will probably crash again immediately!
We cannot specify a different program to run with
docker startBut we can create a new image from the crashed container
docker commit <container_id> debugimage- Then we can run a new container from that image, with a custom entrypoint
docker run -ti --entrypoint sh debugimageObtaining a complete dump
We can also dump the entire filesystem of a container.
This is done with
docker export.It generates a tar archive.
docker export <container_id> | tar tvThis will give a detailed listing of the content of the container.
:EN:- Troubleshooting and getting inside a container :FR:- Inspecter un conteneur en détail, en live ou post-mortem

Restarting and attaching to containers
(automatically generated title slide)
Restarting and attaching to containers
We have started containers in the foreground, and in the background.
In this chapter, we will see how to:
- Put a container in the background.
- Attach to a background container to bring it to the foreground.
- Restart a stopped container.
containers/Start_And_Attach.md
Background and foreground
The distinction between foreground and background containers is arbitrary.
From Docker's point of view, all containers are the same.
All containers run the same way, whether there is a client attached to them or not.
It is always possible to detach from a container, and to reattach to a container.
Analogy: attaching to a container is like plugging a keyboard and screen to a physical server.
containers/Start_And_Attach.md
Detaching from a container (Linux/macOS)
If you have started an interactive container (with option
-it), you can detach from it.The "detach" sequence is
^P^Q.Otherwise you can detach by killing the Docker client.
(But not by hitting
^C, as this would deliverSIGINTto the container.)
What does -it stand for?
-tmeans "allocate a terminal."-imeans "connect stdin to the terminal."
containers/Start_And_Attach.md
Detaching cont. (Win PowerShell and cmd.exe)
Docker for Windows has a different detach experience due to shell features.
^P^Qdoes not work.^Cwill detach, rather than stop the container.Using Bash, Subsystem for Linux, etc. on Windows behaves like Linux/macOS shells.
Both PowerShell and Bash work well in Win 10; just be aware of differences.
containers/Start_And_Attach.md
Specifying a custom detach sequence
- You don't like
^P^Q? No problem! - You can change the sequence with
docker run --detach-keys. - This can also be passed as a global option to the engine.
Start a container with a custom detach command:
$ docker run -ti --detach-keys ctrl-x,x jpetazzo/clockDetach by hitting ^X x. (This is ctrl-x then x, not ctrl-x twice!)
Check that our container is still running:
$ docker ps -lcontainers/Start_And_Attach.md
Attaching to a container
You can attach to a container:
$ docker attach <containerID>- The container must be running.
- There can be multiple clients attached to the same container.
- If you don't specify
--detach-keyswhen attaching, it defaults back to^P^Q.
Try it on our previous container:
$ docker attach $(docker ps -lq)Check that ^X x doesn't work, but ^P ^Q does.
containers/Start_And_Attach.md
Detaching from non-interactive containers
Warning: if the container was started without
-it...- You won't be able to detach with
^P^Q. - If you hit
^C, the signal will be proxied to the container.
- You won't be able to detach with
Remember: you can always detach by killing the Docker client.
containers/Start_And_Attach.md
Checking container output
Use
docker attachif you intend to send input to the container.If you just want to see the output of a container, use
docker logs.
$ docker logs --tail 1 --follow <containerID>containers/Start_And_Attach.md
Restarting a container
When a container has exited, it is in stopped state.
It can then be restarted with the start command.
$ docker start <yourContainerID>The container will be restarted using the same options you launched it with.
You can re-attach to it if you want to interact with it:
$ docker attach <yourContainerID>Use docker ps -a to identify the container ID of a previous jpetazzo/clock container,
and try those commands.
containers/Start_And_Attach.md
Attaching to a REPL
REPL = Read Eval Print Loop
Shells, interpreters, TUI ...
Symptom: you
docker attach, and see nothingThe REPL doesn't know that you just attached, and doesn't print anything
Try hitting
^LorEnter
containers/Start_And_Attach.md
SIGWINCH
When you
docker attach, the Docker Engine sends SIGWINCH signals to the container.SIGWINCH = WINdow CHange; indicates a change in window size.
This will cause some CLI and TUI programs to redraw the screen.
But not all of them.
:EN:- Restarting old containers :EN:- Detaching and reattaching to container :FR:- Redémarrer des anciens conteneurs :FR:- Se détacher et rattacher à des conteneurs

Naming and inspecting containers
(automatically generated title slide)
Objectives
In this lesson, we will learn about an important Docker concept: container naming.
Naming allows us to:
Reference easily a container.
Ensure unicity of a specific container.
We will also see the inspect command, which gives a lot of details about a container.
containers/Naming_And_Inspecting.md
Naming our containers
So far, we have referenced containers with their ID.
We have copy-pasted the ID, or used a shortened prefix.
But each container can also be referenced by its name.
If a container is named thumbnail-worker, I can do:
$ docker logs thumbnail-worker$ docker stop thumbnail-workeretc.containers/Naming_And_Inspecting.md
Default names
When we create a container, if we don't give a specific name, Docker will pick one for us.
It will be the concatenation of:
A mood (furious, goofy, suspicious, boring...)
The name of a famous inventor (tesla, darwin, wozniak...)
Examples: happy_curie, clever_hopper, jovial_lovelace ...
containers/Naming_And_Inspecting.md
Specifying a name
You can set the name of the container when you create it.
$ docker run --name ticktock jpetazzo/clockIf you specify a name that already exists, Docker will refuse to create the container.
This lets us enforce unicity of a given resource.
containers/Naming_And_Inspecting.md
Renaming containers
You can rename containers with
docker rename.This allows you to "free up" a name without destroying the associated container.
containers/Naming_And_Inspecting.md
Inspecting a container
The docker inspect command will output a very detailed JSON map.
$ docker inspect <containerID>[{...(many pages of JSON here)...There are multiple ways to consume that information.
containers/Naming_And_Inspecting.md
Parsing JSON with the Shell
You could grep and cut or awk the output of
docker inspect.Please, don't.
It's painful.
If you really must parse JSON from the Shell, use JQ! (It's great.)
$ docker inspect <containerID> | jq .- We will see a better solution which doesn't require extra tools.
containers/Naming_And_Inspecting.md
Using --format
You can specify a format string, which will be parsed by Go's text/template package.
$ docker inspect --format '{{ json .Created }}' <containerID>"2015-02-24T07:21:11.712240394Z"The generic syntax is to wrap the expression with double curly braces.
The expression starts with a dot representing the JSON object.
Then each field or member can be accessed in dotted notation syntax.
The optional
jsonkeyword asks for valid JSON output.
(e.g. here it adds the surrounding double-quotes.)
:EN:Managing container lifecycle :EN:- Naming and inspecting containers
:FR:Suivre ses conteneurs à la loupe :FR:- Obtenir des informations détaillées sur un conteneur :FR:- Associer un identifiant unique à un conteneur

Labels
(automatically generated title slide)
Labels
Labels allow to attach arbitrary metadata to containers.
Labels are key/value pairs.
They are specified at container creation.
You can query them with
docker inspect.They can also be used as filters with some commands (e.g.
docker ps).
Using labels
Let's create a few containers with a label owner.
docker run -d -l owner=alice nginxdocker run -d -l owner=bob nginxdocker run -d -l owner nginxWe didn't specify a value for the owner label in the last example.
This is equivalent to setting the value to be an empty string.
Querying labels
We can view the labels with docker inspect.
$ docker inspect $(docker ps -lq) | grep -A3 Labels "Labels": { "maintainer": "NGINX Docker Maintainers <docker-maint@nginx.com>", "owner": "" },We can use the --format flag to list the value of a label.
$ docker inspect $(docker ps -q) --format 'OWNER={{.Config.Labels.owner}}'Using labels to select containers
We can list containers having a specific label.
$ docker ps --filter label=ownerOr we can list containers having a specific label with a specific value.
$ docker ps --filter label=owner=aliceUse-cases for labels
HTTP vhost of a web app or web service.
(The label is used to generate the configuration for NGINX, HAProxy, etc.)
Backup schedule for a stateful service.
(The label is used by a cron job to determine if/when to backup container data.)
Service ownership.
(To determine internal cross-billing, or who to page in case of outage.)
etc.
:EN:- Using labels to identify containers :FR:- Étiqueter ses conteneurs avec des méta-données

Advanced Dockerfile Syntax
(automatically generated title slide)
Objectives
We have seen simple Dockerfiles to illustrate how Docker build container images.
In this section, we will give a recap of the Dockerfile syntax, and introduce advanced Dockerfile commands that we might come across sometimes; or that we might want to use in some specific scenarios.
containers/Advanced_Dockerfiles.md
Dockerfile usage summary
Dockerfileinstructions are executed in order.Each instruction creates a new layer in the image.
Docker maintains a cache with the layers of previous builds.
When there are no changes in the instructions and files making a layer, the builder re-uses the cached layer, without executing the instruction for that layer.
The
FROMinstruction MUST be the first non-comment instruction.Lines starting with
#are treated as comments.Some instructions (like
CMDorENTRYPOINT) update a piece of metadata.(As a result, each call to these instructions makes the previous one useless.)
containers/Advanced_Dockerfiles.md
The RUN instruction
The RUN instruction can be specified in two ways.
With shell wrapping, which runs the specified command inside a shell,
with /bin/sh -c:
RUN apt-get updateOr using the exec method, which avoids shell string expansion, and
allows execution in images that don't have /bin/sh:
RUN [ "apt-get", "update" ]containers/Advanced_Dockerfiles.md
More about the RUN instruction
RUN will do the following:
- Execute a command.
- Record changes made to the filesystem.
- Work great to install libraries, packages, and various files.
RUN will NOT do the following:
- Record state of processes.
- Automatically start daemons.
If you want to start something automatically when the container runs,
you should use CMD and/or ENTRYPOINT.
containers/Advanced_Dockerfiles.md
Collapsing layers
It is possible to execute multiple commands in a single step:
RUN apt-get update && apt-get install -y wget && apt-get cleanIt is also possible to break a command onto multiple lines:
RUN apt-get update \ && apt-get install -y wget \ && apt-get cleancontainers/Advanced_Dockerfiles.md
The EXPOSE instruction
The EXPOSE instruction tells Docker what ports are to be published
in this image.
EXPOSE 8080EXPOSE 80 443EXPOSE 53/tcp 53/udpAll ports are private by default.
Declaring a port with
EXPOSEis not enough to make it public.The
Dockerfiledoesn't control on which port a service gets exposed.
containers/Advanced_Dockerfiles.md
Exposing ports
When you
docker run -p <port> ..., that port becomes public.(Even if it was not declared with
EXPOSE.)When you
docker run -P ...(without port number), all ports declared withEXPOSEbecome public.
A public port is reachable from other containers and from outside the host.
A private port is not reachable from outside.
containers/Advanced_Dockerfiles.md
The COPY instruction
The COPY instruction adds files and content from your host into the
image.
COPY . /srcThis will add the contents of the build context (the directory
passed as an argument to docker build) to the directory /src
in the container.
containers/Advanced_Dockerfiles.md
Build context isolation
Note: you can only reference files and directories inside the build context. Absolute paths are taken as being anchored to the build context, so the two following lines are equivalent:
COPY . /srcCOPY / /srcAttempts to use .. to get out of the build context will be
detected and blocked with Docker, and the build will fail.
Otherwise, a Dockerfile could succeed on host A, but fail on host B.
containers/Advanced_Dockerfiles.md
ADD
ADD works almost like COPY, but has a few extra features.
ADD can get remote files:
ADD http://www.example.com/webapp.jar /opt/This would download the webapp.jar file and place it in the /opt
directory.
ADD will automatically unpack zip files and tar archives:
ADD ./assets.zip /var/www/htdocs/assets/This would unpack assets.zip into /var/www/htdocs/assets.
However, ADD will not automatically unpack remote archives.
containers/Advanced_Dockerfiles.md
ADD, COPY, and the build cache
Before creating a new layer, Docker checks its build cache.
For most Dockerfile instructions, Docker only looks at the
Dockerfilecontent to do the cache lookup.For
ADDandCOPYinstructions, Docker also checks if the files to be added to the container have been changed.ADDalways needs to download the remote file before it can check if it has been changed.(It cannot use, e.g., ETags or If-Modified-Since headers.)
containers/Advanced_Dockerfiles.md
VOLUME
The VOLUME instruction tells Docker that a specific directory
should be a volume.
VOLUME /var/lib/mysqlFilesystem access in volumes bypasses the copy-on-write layer, offering native performance to I/O done in those directories.
Volumes can be attached to multiple containers, allowing to "port" data over from a container to another, e.g. to upgrade a database to a newer version.
It is possible to start a container in "read-only" mode. The container filesystem will be made read-only, but volumes can still have read/write access if necessary.
containers/Advanced_Dockerfiles.md
The WORKDIR instruction
The WORKDIR instruction sets the working directory for subsequent
instructions.
It also affects CMD and ENTRYPOINT, since it sets the working
directory used when starting the container.
WORKDIR /srcYou can specify WORKDIR again to change the working directory for
further operations.
containers/Advanced_Dockerfiles.md
The ENV instruction
The ENV instruction specifies environment variables that should be
set in any container launched from the image.
ENV WEBAPP_PORT 8080This will result in an environment variable being created in any containers created from this image of
WEBAPP_PORT=8080You can also specify environment variables when you use docker run.
$ docker run -e WEBAPP_PORT=8000 -e WEBAPP_HOST=www.example.com ...containers/Advanced_Dockerfiles.md
The USER instruction
The USER instruction sets the user name or UID to use when running
the image.
It can be used multiple times to change back to root or to another user.
containers/Advanced_Dockerfiles.md
The CMD instruction
The CMD instruction is a default command run when a container is
launched from the image.
CMD [ "nginx", "-g", "daemon off;" ]Means we don't need to specify nginx -g "daemon off;" when running the
container.
Instead of:
$ docker run <dockerhubUsername>/web_image nginx -g "daemon off;"We can just do:
$ docker run <dockerhubUsername>/web_imagecontainers/Advanced_Dockerfiles.md
More about the CMD instruction
Just like RUN, the CMD instruction comes in two forms.
The first executes in a shell:
CMD nginx -g "daemon off;"The second executes directly, without shell processing:
CMD [ "nginx", "-g", "daemon off;" ]containers/Advanced_Dockerfiles.md
Overriding the CMD instruction
The CMD can be overridden when you run a container.
$ docker run -it <dockerhubUsername>/web_image bashWill run bash instead of nginx -g "daemon off;".
containers/Advanced_Dockerfiles.md
The ENTRYPOINT instruction
The ENTRYPOINT instruction is like the CMD instruction,
but arguments given on the command line are appended to the
entry point.
Note: you have to use the "exec" syntax ([ "..." ]).
ENTRYPOINT [ "/bin/ls" ]If we were to run:
$ docker run training/ls -lInstead of trying to run -l, the container will run /bin/ls -l.
containers/Advanced_Dockerfiles.md
Overriding the ENTRYPOINT instruction
The entry point can be overridden as well.
$ docker run -it training/lsbin dev home lib64 mnt proc run srv tmp varboot etc lib media opt root sbin sys usr$ docker run -it --entrypoint bash training/lsroot@d902fb7b1fc7:/#containers/Advanced_Dockerfiles.md
How CMD and ENTRYPOINT interact
The CMD and ENTRYPOINT instructions work best when used
together.
ENTRYPOINT [ "nginx" ]CMD [ "-g", "daemon off;" ]The ENTRYPOINT specifies the command to be run and the CMD
specifies its options. On the command line we can then potentially
override the options when needed.
$ docker run -d <dockerhubUsername>/web_image -tThis will override the options CMD provided with new flags.
containers/Advanced_Dockerfiles.md
Advanced Dockerfile instructions
ONBUILDlets you stash instructions that will be executed when this image is used as a base for another one.LABELadds arbitrary metadata to the image.ARGdefines build-time variables (optional or mandatory).STOPSIGNALsets the signal fordocker stop(TERMby default).HEALTHCHECKdefines a command assessing the status of the container.SHELLsets the default program to use for string-syntax RUN, CMD, etc.
containers/Advanced_Dockerfiles.md
The ONBUILD instruction
The ONBUILD instruction is a trigger. It sets instructions that will
be executed when another image is built from the image being build.
This is useful for building images which will be used as a base to build other images.
ONBUILD COPY . /src- You can't chain
ONBUILDinstructions withONBUILD. ONBUILDcan't be used to triggerFROMinstructions.
:EN:- Advanced Dockerfile syntax :FR:- Dockerfile niveau expert

Container network drivers
(automatically generated title slide)
Container network drivers
The Docker Engine supports different network drivers.
The built-in drivers include:
bridge(default)null(for the special network callednone)host(for the special network calledhost)container(that one is a bit magic!)
The network is selected with docker run --net ....
Each network is managed by a driver.
The different drivers are explained with more details on the following slides.
The default bridge
By default, the container gets a virtual
eth0interface.
(In addition to its own privateloloopback interface.)That interface is provided by a
vethpair.It is connected to the Docker bridge.
(Nameddocker0by default; configurable with--bridge.)Addresses are allocated on a private, internal subnet.
(Docker uses 172.17.0.0/16 by default; configurable with--bip.)Outbound traffic goes through an iptables MASQUERADE rule.
Inbound traffic goes through an iptables DNAT rule.
The container can have its own routes, iptables rules, etc.
The null driver
Container is started with
docker run --net none ...It only gets the
loloopback interface. Noeth0.It can't send or receive network traffic.
Useful for isolated/untrusted workloads.
The host driver
Container is started with
docker run --net host ...It sees (and can access) the network interfaces of the host.
It can bind any address, any port (for ill and for good).
Network traffic doesn't have to go through NAT, bridge, or veth.
Performance = native!
Use cases:
Performance sensitive applications (VOIP, gaming, streaming...)
Peer discovery (e.g. Erlang port mapper, Raft, Serf...)
The container driver
Container is started with
docker run --net container:id ...It re-uses the network stack of another container.
It shares with this other container the same interfaces, IP address(es), routes, iptables rules, etc.
Those containers can communicate over their
lointerface.
(i.e. one can bind to 127.0.0.1 and the others can connect to it.)
:EN:Advanced container networking :EN:- Transparent network access with the "host" driver :EN:- Sharing is caring with the "container" driver
:FR:Paramétrage réseau avancé :FR:- Accès transparent au réseau avec le mode "host" :FR:- Partage de la pile réseau avece le mode "container"
